Changelog
New features and improvements landing in and around Materialize
AWS IAM Authentication to RDS MySQL
We’ve added support for using AWS IAM to authenticate connections to Amazon RDS MySQL sources
to our managed cloud. Instead of managing static usernames and passwords, you can now create
a CONNECTION to AWS that securely assumes a provided role and authenticates to your RDS MySQL
source via short-lived credentials.
CREATE CONNECTION aws_rds_mysql TO AWS (
    ASSUME ROLE ARN = 'arn:aws:iam::400121260767:role/MaterializeRDS'
);

CREATE CONNECTION mysql_connection TO MYSQL (
    HOST 'instance.foo000.us-west-1.rds.amazonaws.com',
    PORT 3306,
    USER 'abc',
    AWS CONNECTION aws_rds_mysql,
    SSL MODE 'verify_identity'
);
See our full documentation for more details.
New SQL functions
We’ve added support for two new SQL functions in this week’s release of our managed cloud.
regexp_matches
First up: regexp_matches (docs) to return
multiple matching substrings from a regular expression
> SELECT regexp_matches('new Materialize SQL functions are here!', '(new|Materialize|SQL|functions)', 'g');Output:
regexp_matches
---------------
{SQL}
{new}
{functions}
{Materialize}
reverse
Next up: reverse (docs) to reverse a string.
> SELECT reverse('materialize');Output:
reverse
--------
ezilairetamImproved sink restart times
Another week, another big improvement to sinks! This time, we’ve focused on dramatically improving restart times.
When a Kafka sink is restarting, it learns where to resume by reading from the metadata stored in a progress topic on the Kafka cluster. We strongly recommend enabling compaction and disabling tiered storage on this topic for optimal performance. But we know that’s not always feasible. And without those settings, restarting long-running sinks could take… well, a while.
With this weeks changes, Materialize now reads the progress topic backwards. Instead of scanning from the start, we jump straight to the end, cutting down unnecessary work. This makes restarting faster, sometimes a lot faster.
For one user we saw resumptions drop from 48 minutes to 35 seconds!

For others, we saw over a 4x improvement:

We still strongly recommend our best practices settings for the best possible sink experience and to get sink restart times down to seconds. But for those operating with Kafka clusters where this is not possible, sink times should be significantly improved across the board. Enjoy! 🚀
Introducing Materialize Self-Managed and Our Community Edition
Starting today, you can run Materialize on your own infrastructure. 🚀
We’re excited to announce we’re addressing these challenges by introducing Materialize Self-Managed and a free Community Edition.
You can read more about the release here.
Get Started
Can’t wait to get started?
- Choose which deployment model works best for your team.
- Visit our docs to learn more details about setup and configuration.
- Join our Community Slack to swap tips, ask questions, and meet other real-time data enthusiasts.
- Star our Github repo to keep up to date on the latest developments.
Improved memory usage during sink restarts
This week we shipped a significant improvement to the memory requirements needed when restarting a sink.
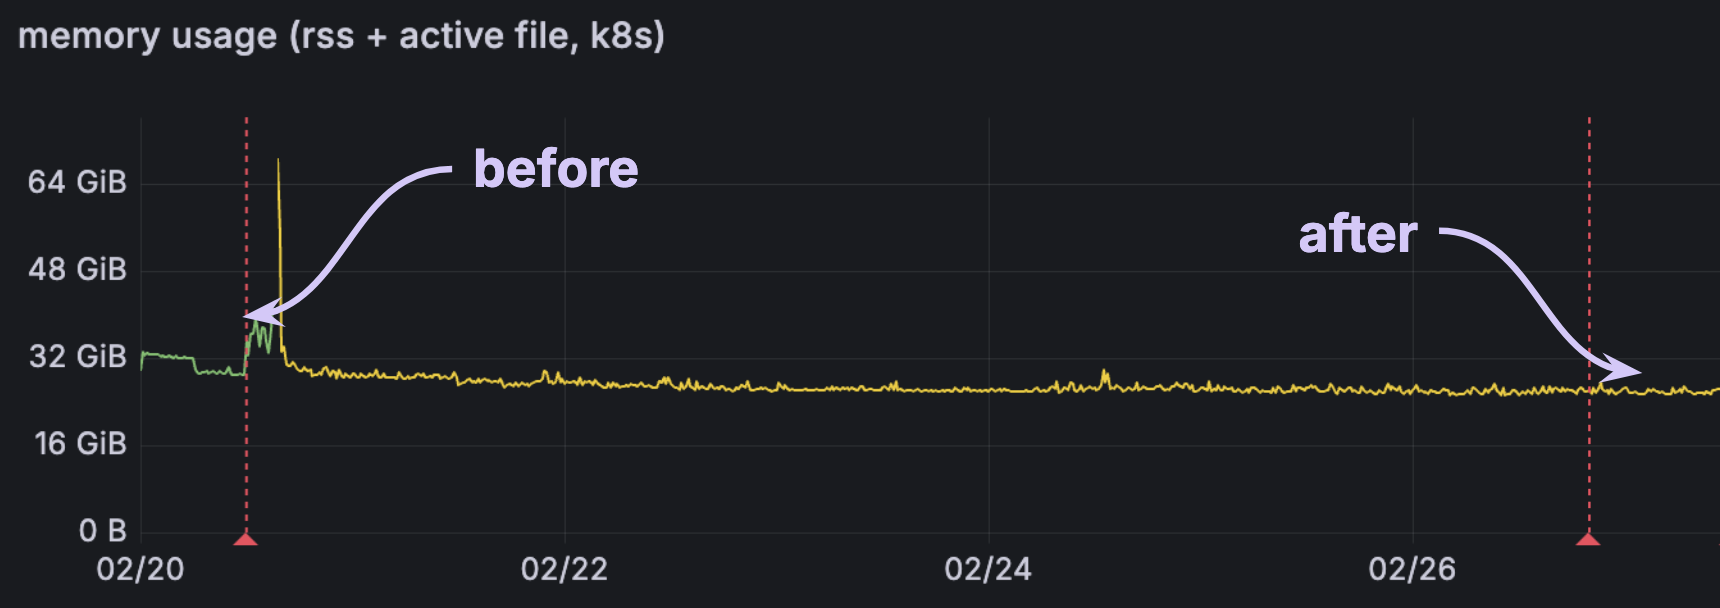
Previously, when restarting a sink we would rehydrate the in-memory state with memory proportional to the full size of the sinked collection, even if the size of the steady-state changes was small. For users sinking out large collections, this led to a pattern of high memory spikes upon cluster restart, followed by a steep drop-off for the rest of the cluster’s uptime. As a result, users needed to size their clusters to support the much larger peak memory usage, that was only used briefly, rather than the lower steady-state memory.
Now, we are able to restart sinks using memory proportional to only the steady-state changes. For some users, the effect of this change has been dramatic!
In one of the more extreme cases, we saw over a 10x reduction in memory:
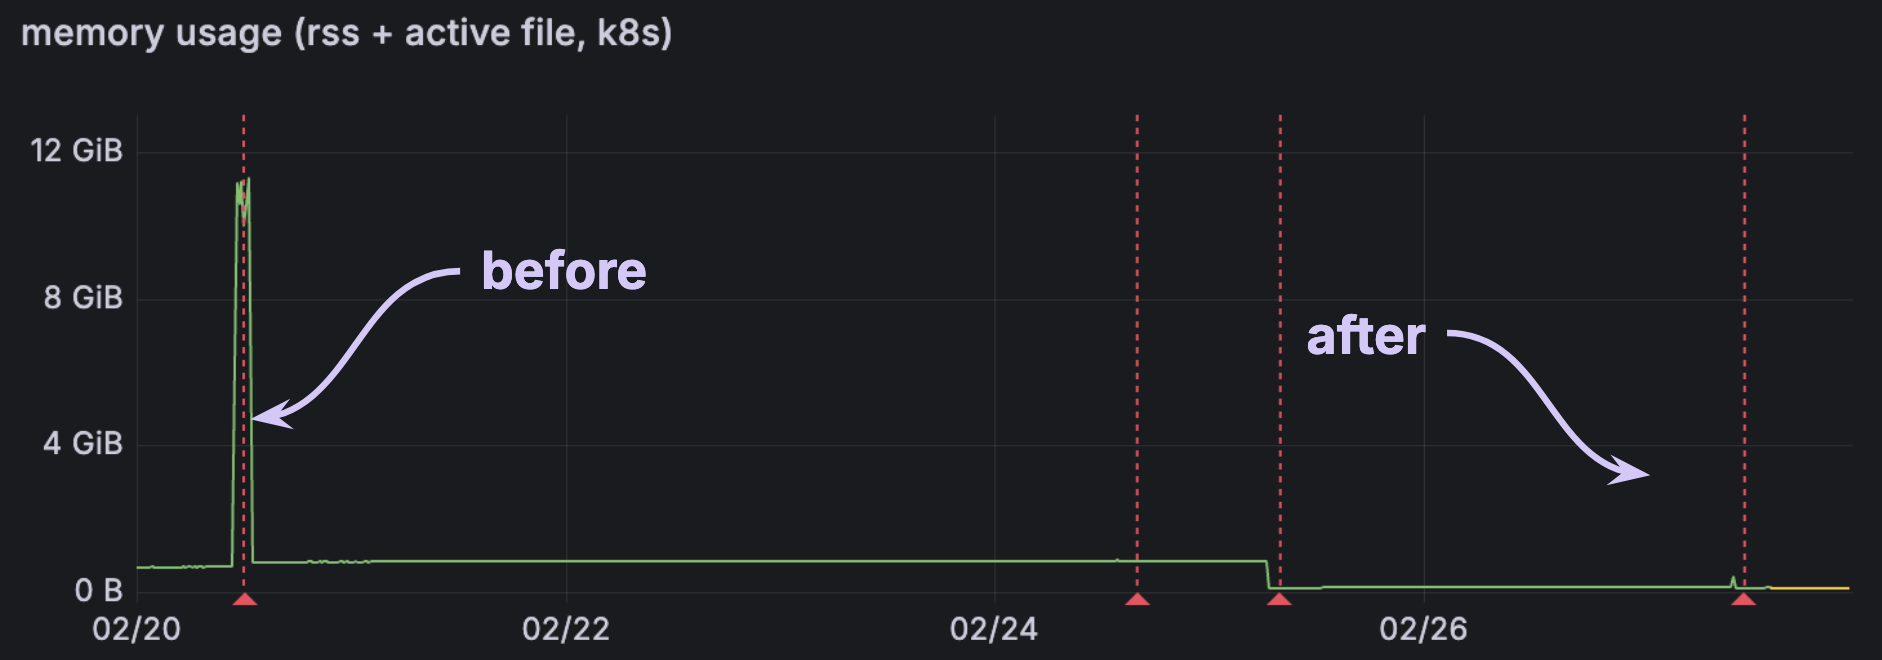
For others, the impact is significant but more modest, with 20-25% reduction to memory:
What does this mean to you?
If you use sinks, your memory usage should now be more much consistent across restarts. It may be newly possible to downsize your clusters if they were previously scaled to handle the sink restart memory spike.
PrivateLink cross-region connectivity ↔️
It’s common for Materialize users to have data ingress/egress services running in a different region than that of their managed cloud deployment. And although VPC peering has long enabled connecting services across regions, setting it up is…not exactly a walk in the park. AWS recently introduced cross-region connectivity for AWS PrivateLink, which allows using interface endpoints to connect to services running in different AWS regions without the complexity (and exposure) of VPC peering.
To allow you to more easily get up and running with Materialize in this scenario, AWS PrivateLink connections now support cross-region connectivity! To connect to an AWS PrivateLink endpoint service in a different region to the one where Materialize is deployed, simply omit the availability zones when creating a new connection:
-- Configure a connection to your AWS PrivateLink service endpoint in us-east-2
-- and omit the availability zones; Materialize will optimally auto-assign
-- them!
CREATE CONNECTION privatelink_svc TO AWS PRIVATELINK (
  SERVICE NAME 'com.amazonaws.vpce.us-east-2.vpce-svc-<endpoint_service_id>',
  -- For now, the AVAILABILITY ZONES clause **is** required, but will be
  -- made optional in a future release.
  AVAILABILITY ZONES ()
);

-- Use the connection to configure to your external source of data, e.g. Amazon
-- RDS for PostgreSQL.
CREATE CONNECTION rds_connection TO POSTGRES (
  HOST '<host>',
  PORT 5432,
  USER 'materialize',
  PASSWORD SECRET pgpass,
  DATABASE '<database>',
  AWS PRIVATELINK privatelink_svc
  );

-- Start ingesting PostgreSQL CDC data from your database in us-east-2 in your
-- Materialize us-east-1 environment!
CREATE SOURCE mz_source
  FROM POSTGRES CONNECTION rds_connection (PUBLICATION 'mz_source')
  FOR ALL TABLES;
For cross-region connections, availability zones will be optimally auto-assigned when none are provided. For local connections, you still have to ensure that the specified availability zones of the Network Load Balancer and the consumer VPC match. Check out the updated network security documentation for a full rundown on how to connect to your up- or downstream AWS services via AWS PrivateLink — now extended with cross-region support!
Console: improved cluster observability
If you’re using blue/green deployments to manage schema changes in Materialize, you’ve likely felt the frustration of seeing your cluster metrics get blown away every time you cut over to a newly minted environment. Rightfully so! This gets in the way of understanding how the health of your clusters is evolving over time. 🤕
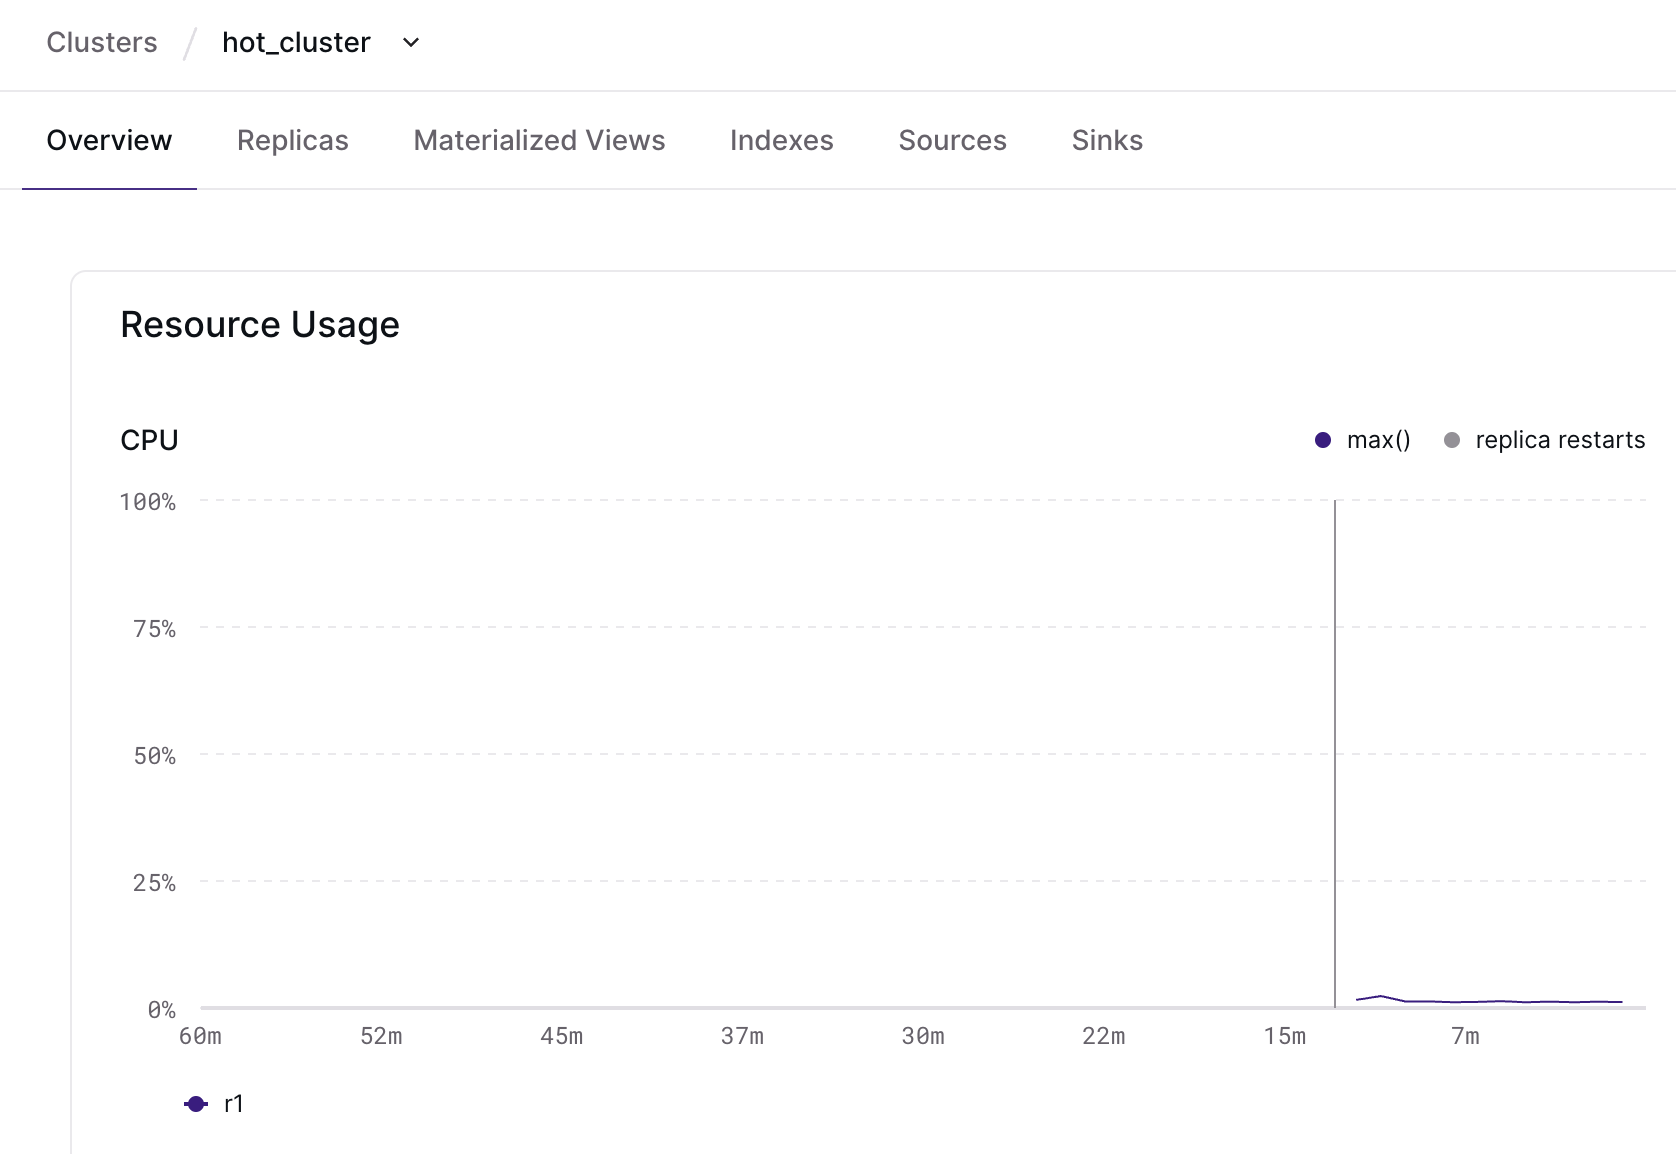
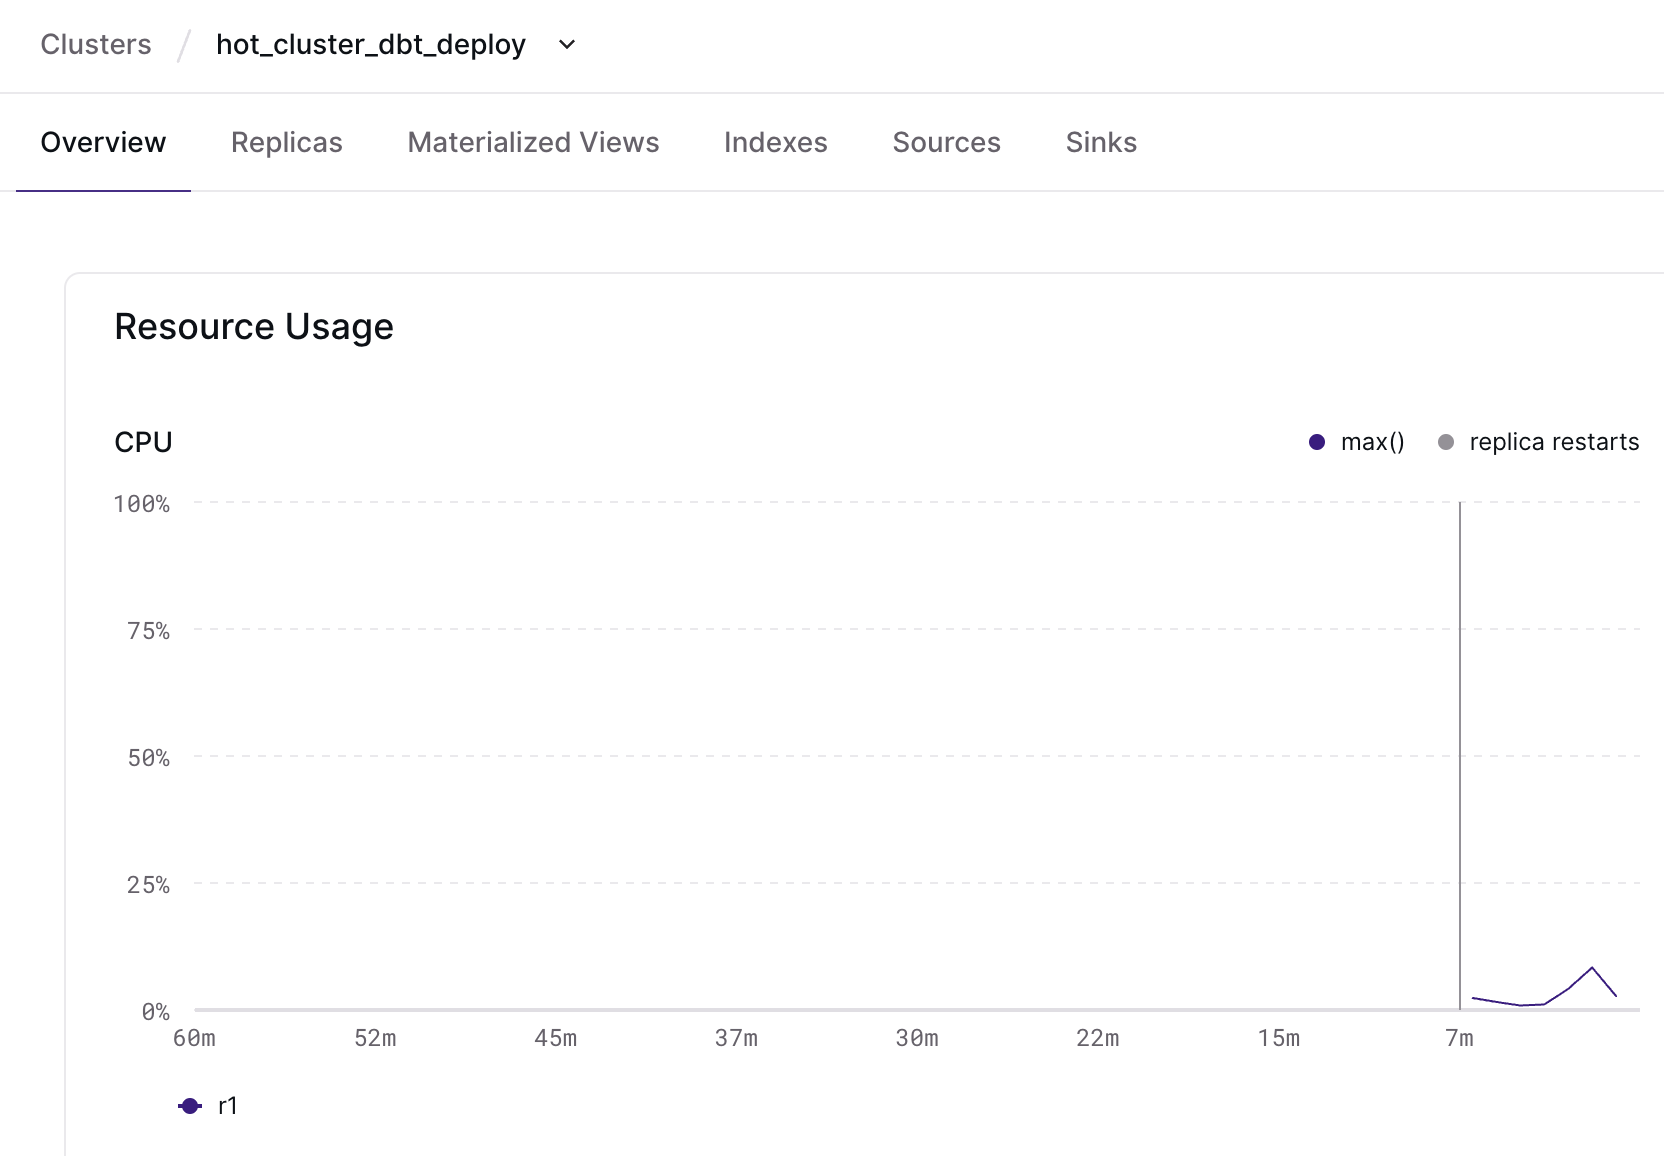
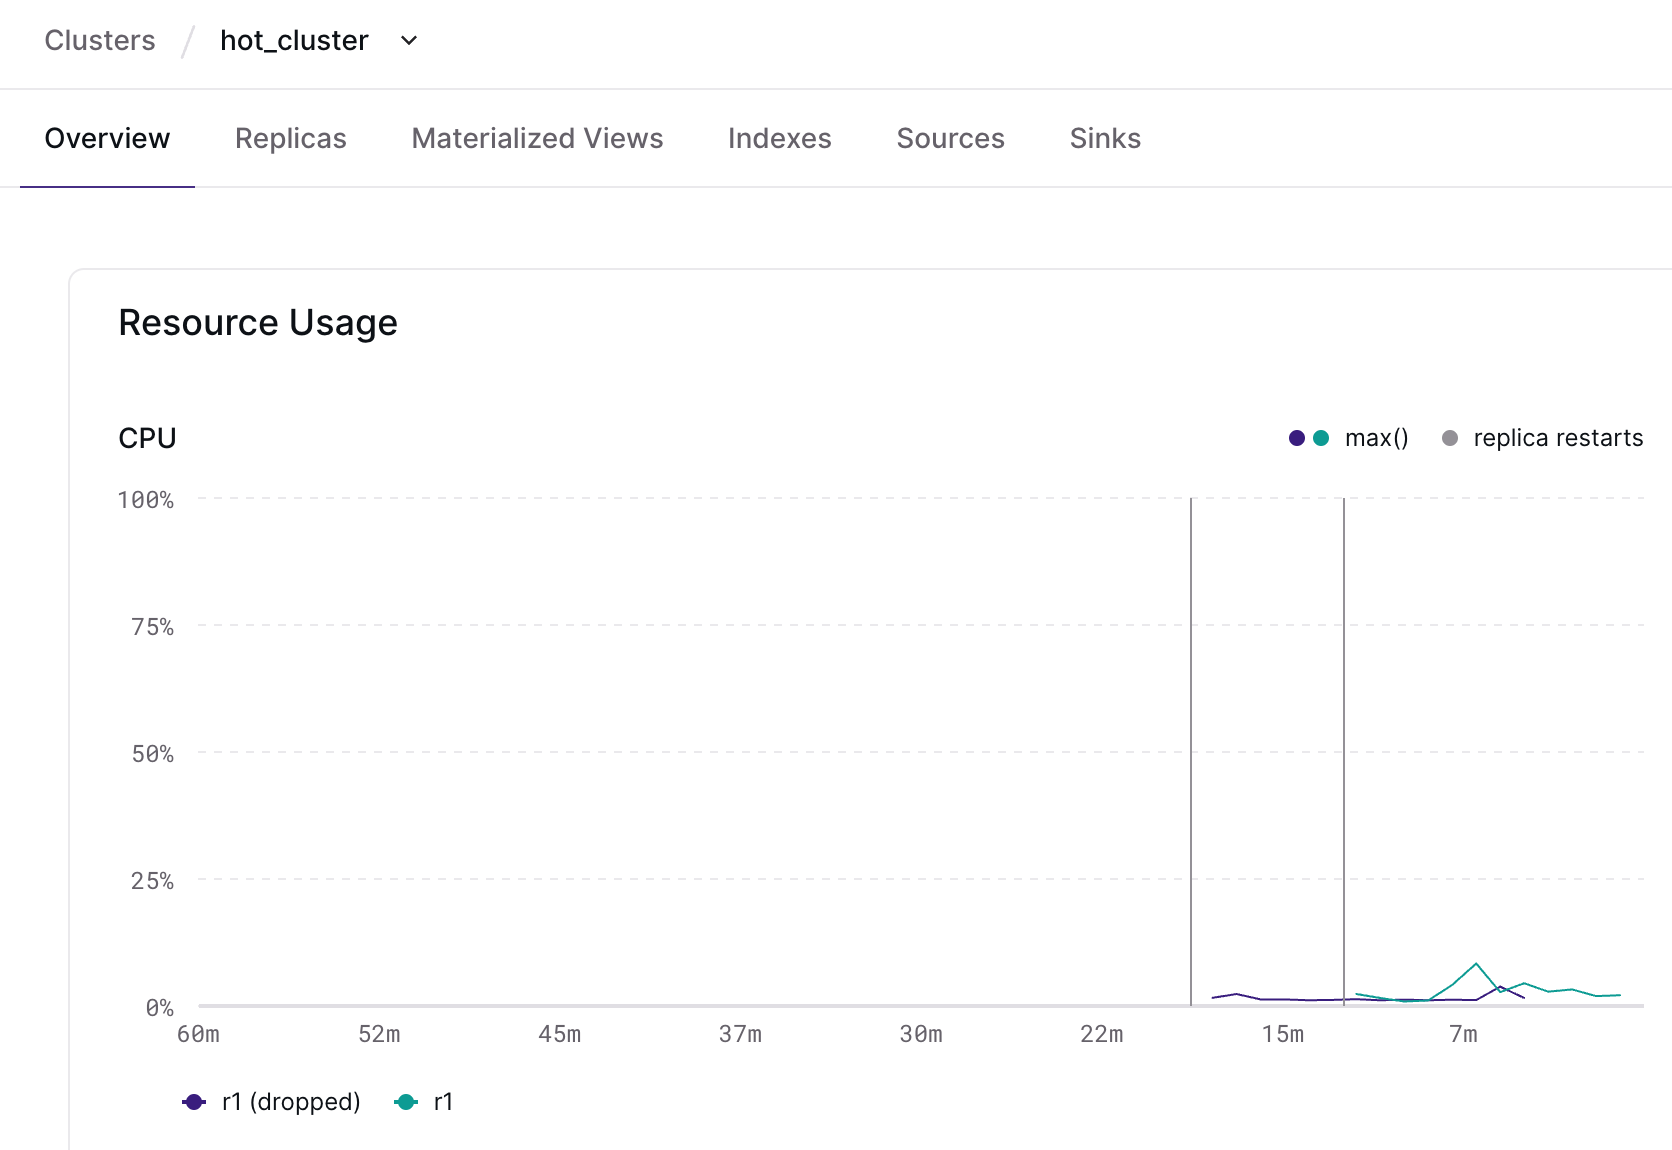
To address this, we’ve improved how clusters that undergo blue/green deployments are displayed in the Materialize Console: you now get access to cluster utilization and health metrics across deployments! Let’s look at an example:
During a blue/green deployment
While hot_cluster is busy doing cluster work, a new hot_cluster_dbt_deploy
cluster is hydrating with your changes. You can monitor each cluster in its
individual overview page and take your time validating the deployment.
After a blue/green deployment
Once you’re confident in the deployed changes, you can swap the clusters to push
them live! Now, the cluster overview page will retain the metrics of the
pre-deployment cluster, rather than just showing you the metrics for the
post-deployment hot_cluster (née hot_cluster_dbt_deploy).
important
Note: If you’re rolling out your own observability, the system catalog table
to look at for pre- and post-deployment cluster mapping is
mz_cluster_deployment_lineage.
With this improvement, you can more easily keep a pulse on the health of your environment as you evolve it, as well as identify any regressions after applying schema changes to your data model!
Recursive CTEs
We’re thrilled to announce that recursive CTEs are now stable in Materialize! This milestone unlocks an entirely new class of iterative SQL queries, enabling you to work with hierarchical and recursive data structures directly in SQL.
Recursive CTEs are indispensable for applications requiring traversal or accumulation along hierarchical data - think organizational structures, bill of materials, or nested permissions. They make it possible to compute dynamic, incremental results in scenarios where standard SQL falls short.
But we didn’t stop at just implementing the standard WITH RECURSIVE clause.
Instead, we took it a step further by supporting mutual recursion, a more
powerful and expressive primitive that handles some of the fundamental
limitations of traditional recursive CTEs.
Why mutual recursion?
The standard WITH RECURSIVE clause has practical issues
when handling more complex computations or when multiple recursive relations
depend on each other. By introducing the extended WITH MUTUALLY RECURSIVE
clause, Materialize allows you to define interdependent recursive queries,
opening the door to advanced use cases like:
- Stable matching algorithms;
- Dynamic programming for optimization problems;
- Solving all of 2023’s Advent of Code challenges;
- And much more - it’s Turing complete!
Example: permissions in hierarchical systems
One common use case for recursion in applications is resolving permissions in hierarchical systems. Think of scenarios like managing access for teams and sub-teams or sharing files within nested groups — permissions often need to flow from parent to child unless explicitly overridden. Using recursion, you can dynamically keep permissions up-to-date as the hierarchy structure changes.
-- Permission groups.
CREATE TABLE groups (
    group_id        TEXT,
    parent_group_id TEXT
);

INSERT INTO groups VALUES
('group1', NULL),       -- Root group
('group2', 'group1'),   -- Child of group1
('group3', 'group2');   -- Child of group2

-- Documents that not all (sub-)teams should have unrestricted access to! 🔒
CREATE TABLE documents (
    document_id TEXT
);

INSERT INTO documents VALUES
('doc1'), ('doc2');

-- Per-document permission matrix.
CREATE TABLE permissions (
    group_id        TEXT,
    document_id     TEXT,
    permission_type TEXT
);

INSERT INTO permissions VALUES
('group1', 'doc1', 'reader'), -- group1 can read doc1
('group2', 'doc2', 'editor'); -- group2 can edit doc2

-- Based on group membership, recursively unnest the full document permission
-- hierarchy. This view can then be used to control access to specific
-- documents on the fly, as groups and permissions change.
CREATE VIEW effective_permissions AS
WITH MUTUALLY RECURSIVE permission_hierarchy (group_id TEXT, document_id TEXT, permission_type TEXT) AS (
    SELECT
        g.group_id,
        p.document_id,
        p.permission_type
    FROM groups g
    JOIN permissions p ON g.group_id = p.group_id
    UNION ALL
    SELECT
        g.group_id,
        ph.document_id,
        ph.permission_type
    FROM groups g
    JOIN permission_hierarchy ph ON g.parent_group_id = ph.group_id
    WHERE NOT EXISTS (
        SELECT 1
        FROM permissions bp
        WHERE bp.group_id = g.group_id AND bp.document_id = ph.document_id
    )
)
SELECT DISTINCT group_id, document_id, permission_type
FROM permission_hierarchy;

-- For demo purposes, the results here are static; you can easily instruct
-- Materialize to keep the results incrementally up-to-date by creating an
-- index on the view.
SELECT * FROM effective_permissions;

| group_id | document_id | permission_type |
| -------- | ----------- | --------------- |
| group1   | doc1        | reader          |
| group2   | doc1        | reader          |
| group2   | doc2        | editor          |
| group3   | doc1        | reader          |
| group3   | doc2        | editor          |
Ready to dive in? For more details on how Recursive CTEs work in Materialize, check out this blog post. If you have questions about the implementation or are curious if recursive CTEs can solve your use case, ping us on Slack!
Improved performance for temporal filters
In Materialize, temporal filters let you implement a common SQL pattern: time windowing. This is useful to reduce the amount of state Materialize has to keep track of when handling append-only workloads (i.e., with data that grows unboundedly) by automatically expiring old data.
Like everything, handling the yet-to-be-expired data in a temporal filter has a cost: memory and CPU. 💀 The good news is that we’ve recently rolled out an optimization to the temporal filter implementation that significantly reduced memory utilization across all environments running these workloads — some even seeing a decrease of over 50%. Now, the Materialize runtime knows to use persistent storage (rather than active memory or local disk) to stash this state until it’s needed.
What does this mean to you?
If you’re running append-only workloads and wide-timespan temporal filters, you should’ve noticed a drop in resource utilization in your environment that can look as dramatic as this:

This drop in resource utilization means that you can scale down any clusters that are now overprovisioned to run these workloads! This also allows you to bring in new workloads with much wider temporal filters than before without an increase in cost.
How can you check your environment?
In the Materialize Console, click on the
Clusters tab in the side navigation bar and drill into any cluster that is
running a workload fitting the characteristics described in this post. Set the
date range picker to Last 14 Days and check the memory chart under Resource Usage.
For more details and best practices on how to use temporal filters in Materialize, check out this blog post and the documentation on SQL patterns.
Private Preview: Network policies
important
Note: Because this feature is in Private Preview, you’ll need to ping our team on Slack to get early access. 🖖
By default, Materialize is available over the public internet to any authenticated user. As an admin, you can configure granular access control to the resources in your Materialize region using role-based access control (RBAC) — but what about controlling access one level up, in the network layer?
To allow you to more easily comply with internal network security protocols, you can now configure network policies to restrict access to your Materialize region using IP-based rules. And, just like everything else in Materialize, you can do it in SQL!
-- Create a network policy that restricts access to Materialize from the range
-- of IP addresses used in your company's offices. The network policy will
-- apply globally to all users.
CREATE NETWORK POLICY office_access_policy (
  RULES (
    new_york (action='allow', direction='ingress',address='1.2.3.4/28'),
    minnesota (action='allow',direction='ingress',address='2.3.4.5/32')
  )
);

-- Document the scope of the network policy, because you're a good sport.
COMMENT ON NETWORK POLICY office_access_policy IS 'Network policy for office locations 🔒';

-- List all network policies in the system.
SHOW NETWORK POLICIES;

| name                 | rules              | comment                                |
| -------------------- | ------------------ | -------------------------------------- |
| default              | open_ingress       |                                        |
| office_access_policy | minnesota,new_york | Network policy for office locations 🔒 |
If you’re using Terraform to manage access control, you can configure network policies in an automated, source-controlled way using the Materialize Terraform provider (v0.8.11+). Here’s how the example above would look like in Terraform:
resource "materialize_network_policy" "office_policy" {
  name = "office_access_policy"

  rule {
    name      = "minnesota"
    action    = "allow"
    direction = "ingress"
    address   = "2.3.4.5/32"
  }

  rule {
    name      = "new_york"
    action    = "allow"
    direction = "ingress"
    address   = "1.2.3.4/28"
  }

  comment = "Network policy for office locations 🔒"
}
This is another step towards improving access control in Materialize! 🔒 In the future, we’ll support role- and object-level network policies, as well as egress network policies. If you have feedback, or just opinions about access control, ping our team on Slack!
Public Preview: S3 bulk exports ❄️
A few months ago, we announced a new option to serve results from Materialize that allows you to bulk-export data to Amazon S3. After incorporating feedback from power users running bulk exports in production during Private Preview, we’re now making it available to all Materialize users, along with compatibility for Google Cloud Storage (GCS).
How does it work?
As a recap: we’ve extended the COPY TO command
to work as a “one-shot sink” that can (efficiently) write files to an S3
(or S3-compatible) path. Here’s what the workflow looks like in Materialize:
1. Create an AWS connection to allow Materialize to securely authenticate with your S3 service:
CREATE CONNECTION aws_conn TO AWS (
  ASSUME ROLE ARN = 'arn:aws:iam::001234567890:role/MZS3Exporter'
);
2. Double-check that you didn’t miss any IAM configuration steps (🙋♀️):
VALIDATE CONNECTION aws_conn;3. And then trigger the copy command with either the object or the query for which you want results to be exported:
COPY my_view TO 's3://mz-to-snow/20241125/'
  WITH (
    AWS CONNECTION = aws_conn,
    FORMAT = 'parquet'
  );
What’s new?
Although Materialize doesn’t integrate natively with GCS, GCS is interoperable with Amazon S3 via the Cloud Storage XML API. 🧠 This allows you to export data to GCS using an AWS connection with an HMAC key and the same workflow documented above. Unfortunately, Azure Blob Storage does not provide an S3-compatibility layer (crazy, we know!), so supporting this service requires rolling out a native integration.
In the future, we plan to add native support for Google Cloud Platform (GCP) and Azure connections, so the developer experience is smoother and you can integrate with each cloud provider’s own Identity and Access Management (IAM) system, instead of relying on credentials-based authentication.
How do you get started?
For an overview of how bulk exports work, as well as integration guides with downstream systems like Snowflake, check the reference documentation.
Ready to give it a go? Sign up for a 14-day free trial of Materialize.
Public Preview: MySQL source
A few months ago, we announced a new MySQL source that allows you to replicate data from your MySQL database to Materialize with no dependencies and in real-time. After incorporating feedback from power users running the MySQL source in production during Private Preview, we’re now making it available to all Materialize users, along with some new features: support for PrivateLink connections and source creation via the Materialize console.
How does it work?
The source uses MySQL’s binlog replication protocol to continually ingest
changes resulting from INSERT, UPDATE and DELETE operations in your
upstream database. As a MySQL user, this comes with a few benefits:
No additional infrastructure: ingest MySQL change data into Materialize in real-time with no architectural changes or additional operational overhead.
Transactional consistency: we’re all about correctness, so the new source ensures that transactions in MySQL are respected downstream. Materialize will never show partial results based on partially replicated transactions.
Incrementally updated materialized views: materialized views are not supported in (vanilla) MySQL, so you can use Materialize as a read-replica to build views on top of your MySQL data that are efficiently maintained and always up-to-date.
What’s new?
In addition to the base functionality, we’ve added two new features to both make it easier to get started and improve the production-readiness of the MySQL source:
Support for PrivateLink connections: if your database is running in a private network, you can now use AWS PrivateLink to connect Materialize to the database without exposing traffic to the public internet. As a reminder, you can alternatively tunnel connections through an SSH bastion host.
Source creation via the Materialize console: you no longer need to type SQL commands to create a MySQL source (it only takes three SQL statements, anyway!), and can set up MySQL CDC with just a few clicks.
How do you get started?
Once you configure your upstream database for replication, setting up a MySQL source in Materialize now takes, as promised, just a few clicks in the Materialize console:
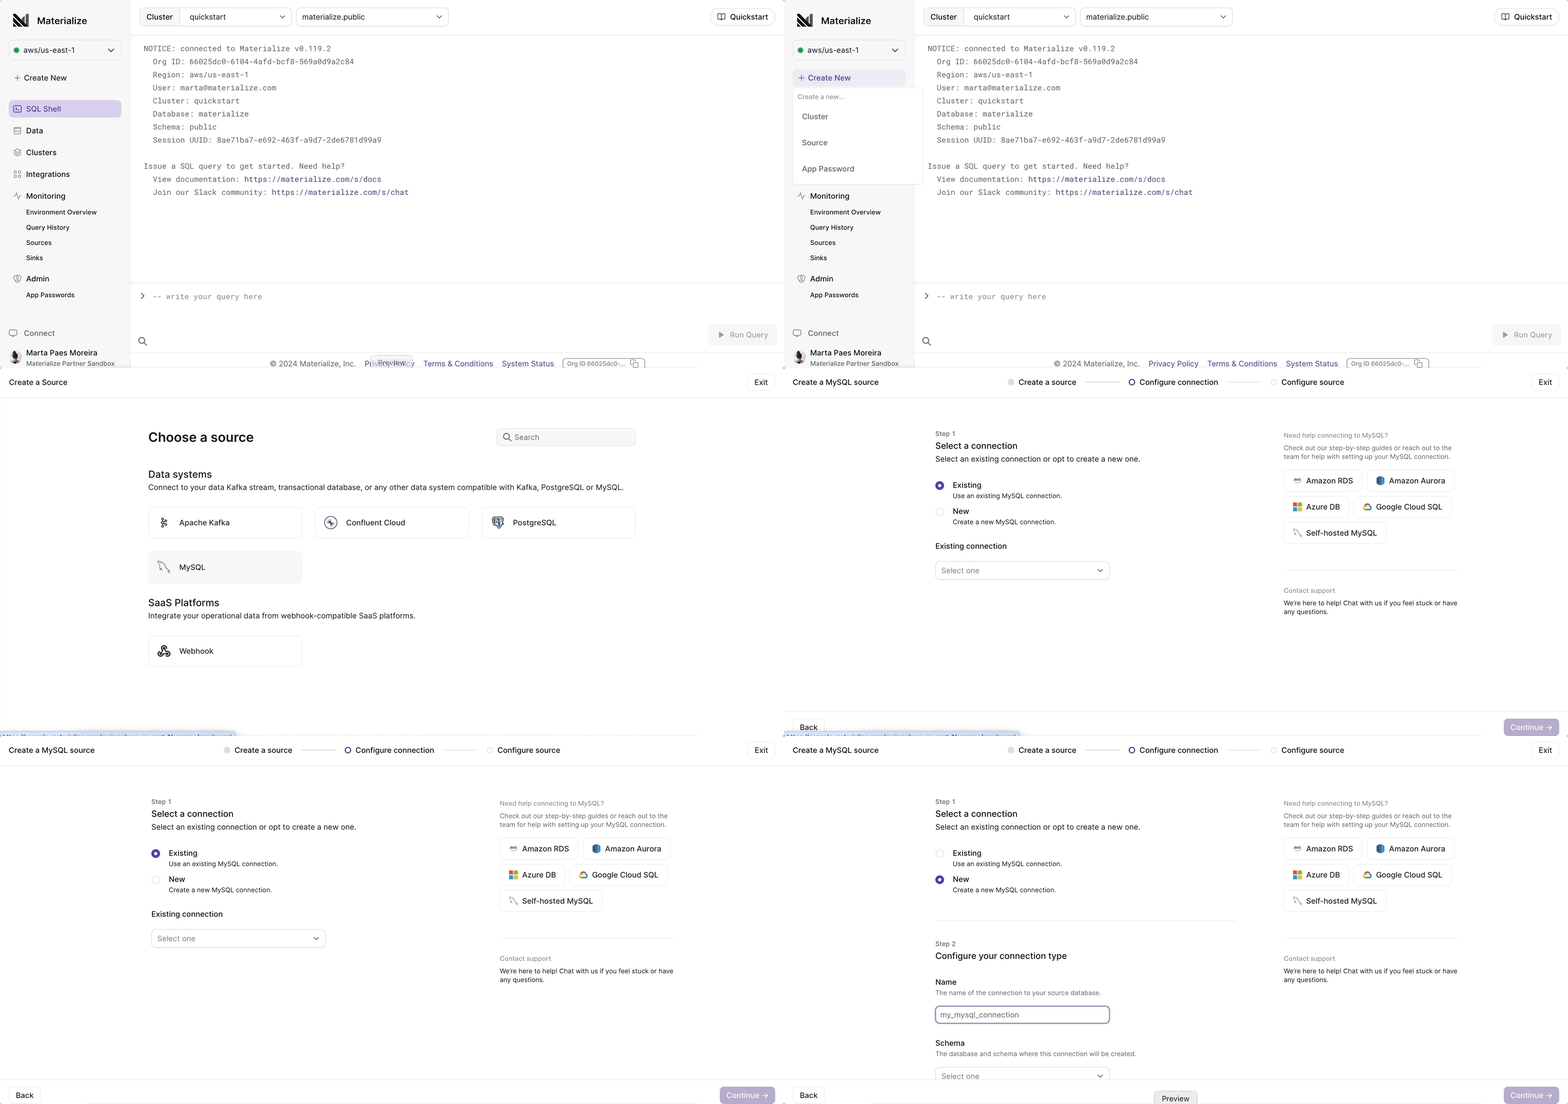
For an overview of how MySQL CDC works in Materialize, as well as integration guides for common MySQL managed services, check out the documentation. Ready to give it a go? Sign up for a 14-day free trial of Materialize.
Console: Environment Overview
If you’re running Materialize in production, you might have wondered if you’ve provisioned the right amount of resources for your workload — overprovisioning means that you’re overpaying for what you need, but underprovisioning leaves you at risk of OOMs. What you really want is certainty that the resources you have are a good fit for the workload you’re trying to run!
We just launched something new in the Materialize console to help you build that certainty: the Environment Overview page.
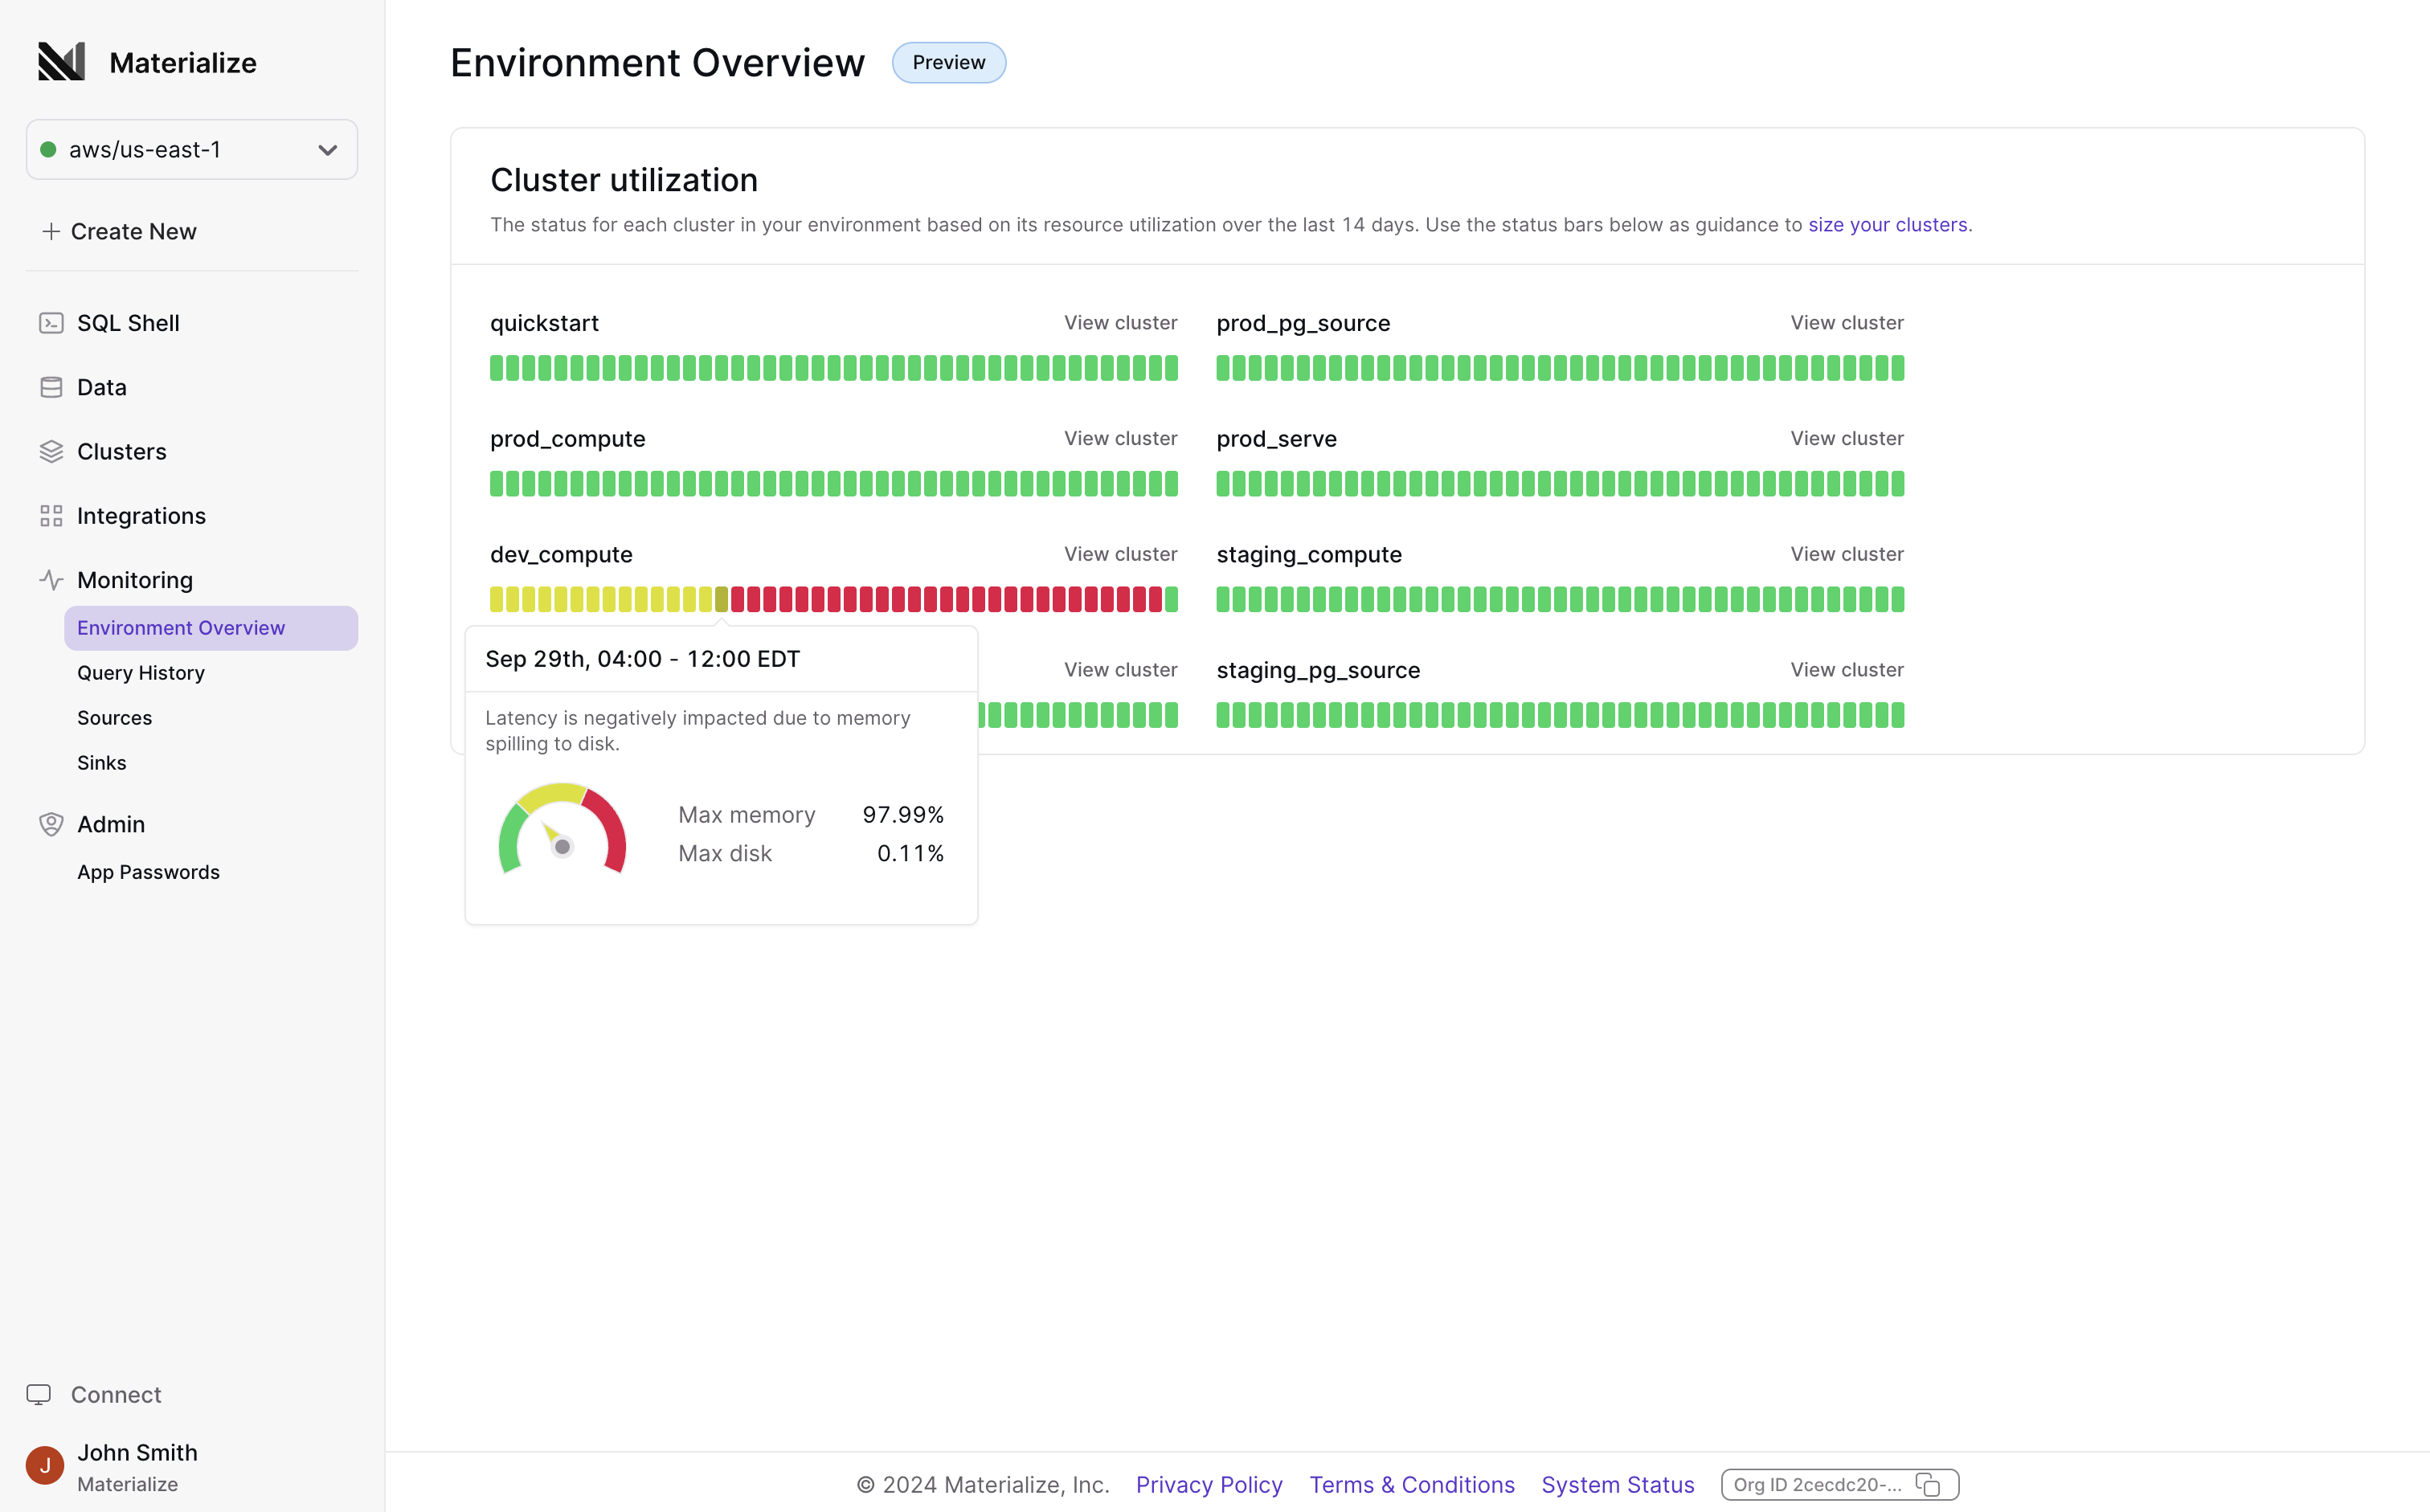
The new Environment Overview page gives you a birds-eye view into the performance and utilization of clusters in your Materialize environment over the past 14 days. You can now easily spot if any of them need to be resized (in either direction).
This is another step towards improving the in-console observability experience! We’ll keep adding to the Environment Overview page over the coming weeks and months. If there’s anything you’d be particularly eager to see in there, please let us know!
SQL Shell: Follow raw SUBSCRIBE results
SUBSCRIBE is a powerful Materialize idiom, allowing clients to opt-in to
receive updates to their data as it is computed. These updates arrive as a
series of diffs that retract and append new values to your local view of the
data. While great for machines, this may not be useful for those wishing to
explore their data. To address that, the Shell reduces the diffs into a table
that updates-in-place as the underlying data changes. For those interested in
seeing the firehose of diffs, they can be revealed by toggling the “Show diffs”
switch above the results table (if you’re interested in learning more, check
out our post on building the SQL Shell).
Previously, as additional pages of diffs were added to this raw view, you would need to manually advance the pages to see the most recent diffs pushed to your browser. This was pretty tedious.
Until now.
We have updated the default behavior of raw SUBSCRIBE output to “follow” the
most recent diff page. If you wish to freeze (“unfollow”) this automatic
advancement, simply change the page or hit the pause button to explore at your
leisure. When you’re ready to resume, just hit the play button.
This is live in the Console. Check it out and let us know what you think!
Multiple Organizations in Console
The Materialize Console now supports logging into multiple organizations in the same browser. This is useful if you have separate organizations for staging and production.
Previously, the selected organization was synced across browser tabs, but now it’s per tab, making it easy to look at all your organizations from your favorite browser!
GitHub Discussions for feature requests and bug reports
To better support our growing team and user base, we’ve split out our external-facing feature requests and bug reports from our internal task tracking. What does this mean for you, as a user? If you run into any snags or have requests for new features you’d like to see in Materialize, you should now use the public GitHub Discussions forum instead of GitHub Issues (which now live in an internal-facing repository).
This change allows our Product and Engineering teams to manage tasks and planning more effectively behind the scenes. We’ll use the GitHub Discussions forum to post updates on feature requests as Engineering work progresses, so you can still subscribe to the threads you’re interested in to stay up to speed!
As always, you can also join the Materialize Community Slack for support. Slack is the best place to get timely help from the Materialize team and other users. Either way — drop by! We’re excited to keep the conversation going! 👋
Kafka sink: topic configuration, custom partitioning, and more!
As more users turn to Kafka (or Kafka API-compatible brokers, like Redpanda) to build automation downstream of Materialize, we’ve been working on improving the developer experience of the Kafka sink. To keep you up to speed, here’s an overview of the sink-related improvements that shipped in the latest releases of Materialize!
Topic configuration
When a new Kafka sink is created, Materialize automatically creates a new topic downstream with the default broker configurations. You can now override specific settings like partition count, replication factor, and retention policy for this topic, as well as schema registry compatibility types.
Example:
CREATE SINK custom_topic_sink
  FROM my_matview
  INTO KAFKA CONNECTION kafka_connection (
    TOPIC 'test_avro_topic',
    TOPIC PARTITION COUNT 4,
    TOPIC REPLICATION FACTOR 2,
    TOPIC CONFIG MAP['cleanup.policy' => 'compact']
  )
  FORMAT AVRO USING CONFLUENT SCHEMA REGISTRY CONNECTION csr_connection
  ENVELOPE UPSERT;
Compression
To improve throughput and network bandwidth usage, all sinks now default
to lz4 compression.
To change the default commpression algorithm applied to messages before they’re
sent out to your downstream broker, or disable compression altogether, you can
use the new COMPRESSION TYPE
sink option.
Example:
CREATE SINK compression_disabled_sink
  FROM my_matview
  INTO KAFKA CONNECTION kafka_connection (
    TOPIC 'sink-compression',
    COMPRESSION TYPE 'none'
  )
  FORMAT AVRO USING CONFLUENT SCHEMA REGISTRY CONNECTION csr_connection
  ENVELOPE UPSERT;
Custom partitioning
By default, the Kafka sink uses a partitioning strategy based on the key
(if any!) of the messages being emitted. Depending on the nature of your data,
you might want more explicit control over how messages are distributed across
partitions — after all, this has performance, availability and data governance
implications! To specify a custom partitioning strategy, you can now use the
PARTITION BY
sink option.
CREATE SINK customer_orders
  FROM my_matview
  INTO KAFKA CONNECTION kafka_connection (
    TOPIC 'customer-orders',
    -- The partition hash includes only the customer ID, so the partition
    -- will be assigned only based on the customer ID.
    PARTITION BY = seahash(customer_id::text)
  )
  -- The key includes both the customer ID and order ID, so Kafka's compaction
  -- will keep only the latest message for each order ID.
  KEY (customer_id, order_id)
  FORMAT AVRO USING CONFLUENT SCHEMA REGISTRY CONNECTION csr_connection
  ENVELOPE UPSERT;
That’s it for now!
Check out the updated documentation for an overview of features old and new, and reach out to our team if you have feedback or suggestions for other features you’d like to see in the Kafka sink!
Materialize Emulator 💻
The Materialize Emulator is the quickest way to explore Materialize hands-on in a local environment.
The Emulator, an all-in-one Docker image distributed through Docker Hub, is designed for local functional testing and learning what’s possible in Materialize. All it takes is a simple docker pull and run.
Download the Emulator now to get started.
And when you’re ready for a fully supported, production-grade experience, you can sign up for a free trial of our hosted offering.
Console: Database Explorer 🔍
Are you new to your team’s database? Or hunting for that crucial system table you rely on for monitoring? We’ve got you covered with the Database Explorer.
We streamlined the navigation of objects into a single Data tab. Now you can explore items in a traditional SQL database structure that directly reflects Materialize under the hood.
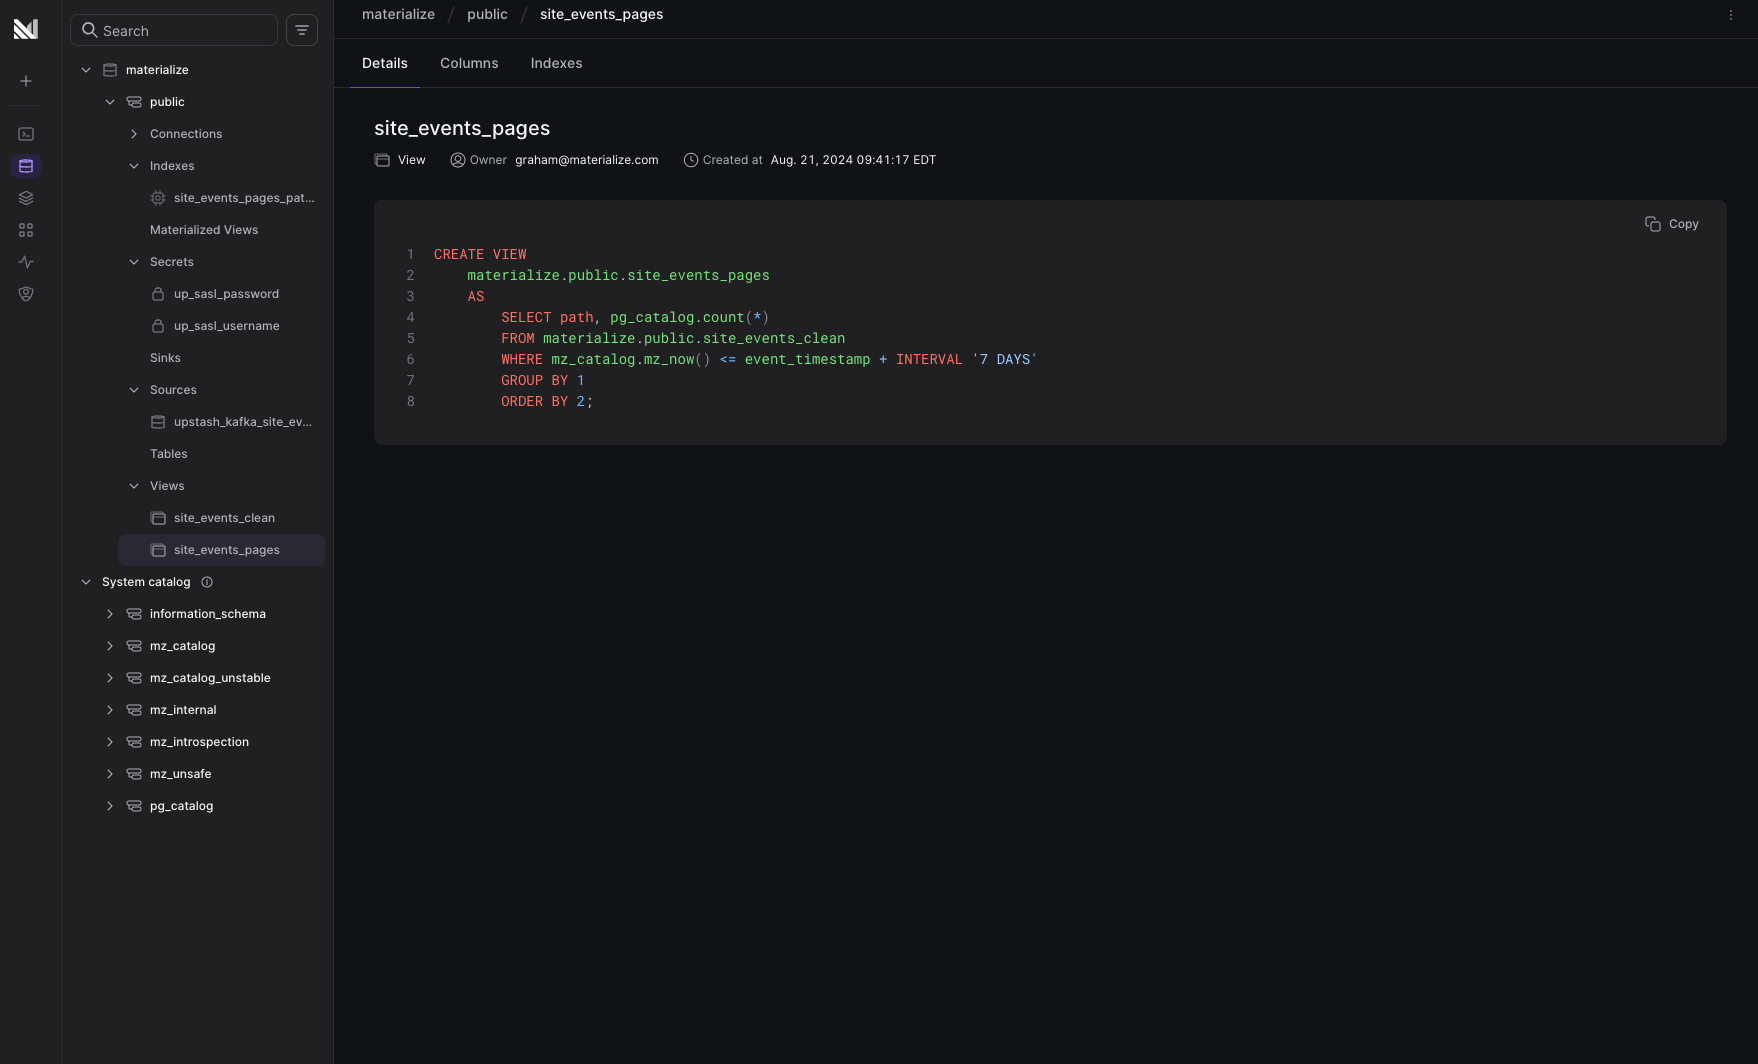
Browse by schema and object type, or search across everything at once. Happy exploring!
Console: sink overview UI ✨
It’s now easier to keep up with the health of your sinks right in the
Materialize console: instead of running lengthy introspection queries by hand,
you can now monitor commit progress (or lack thereof), throughput
and cluster resource utilization using the new Overview page in the
Sinks navigation tab.
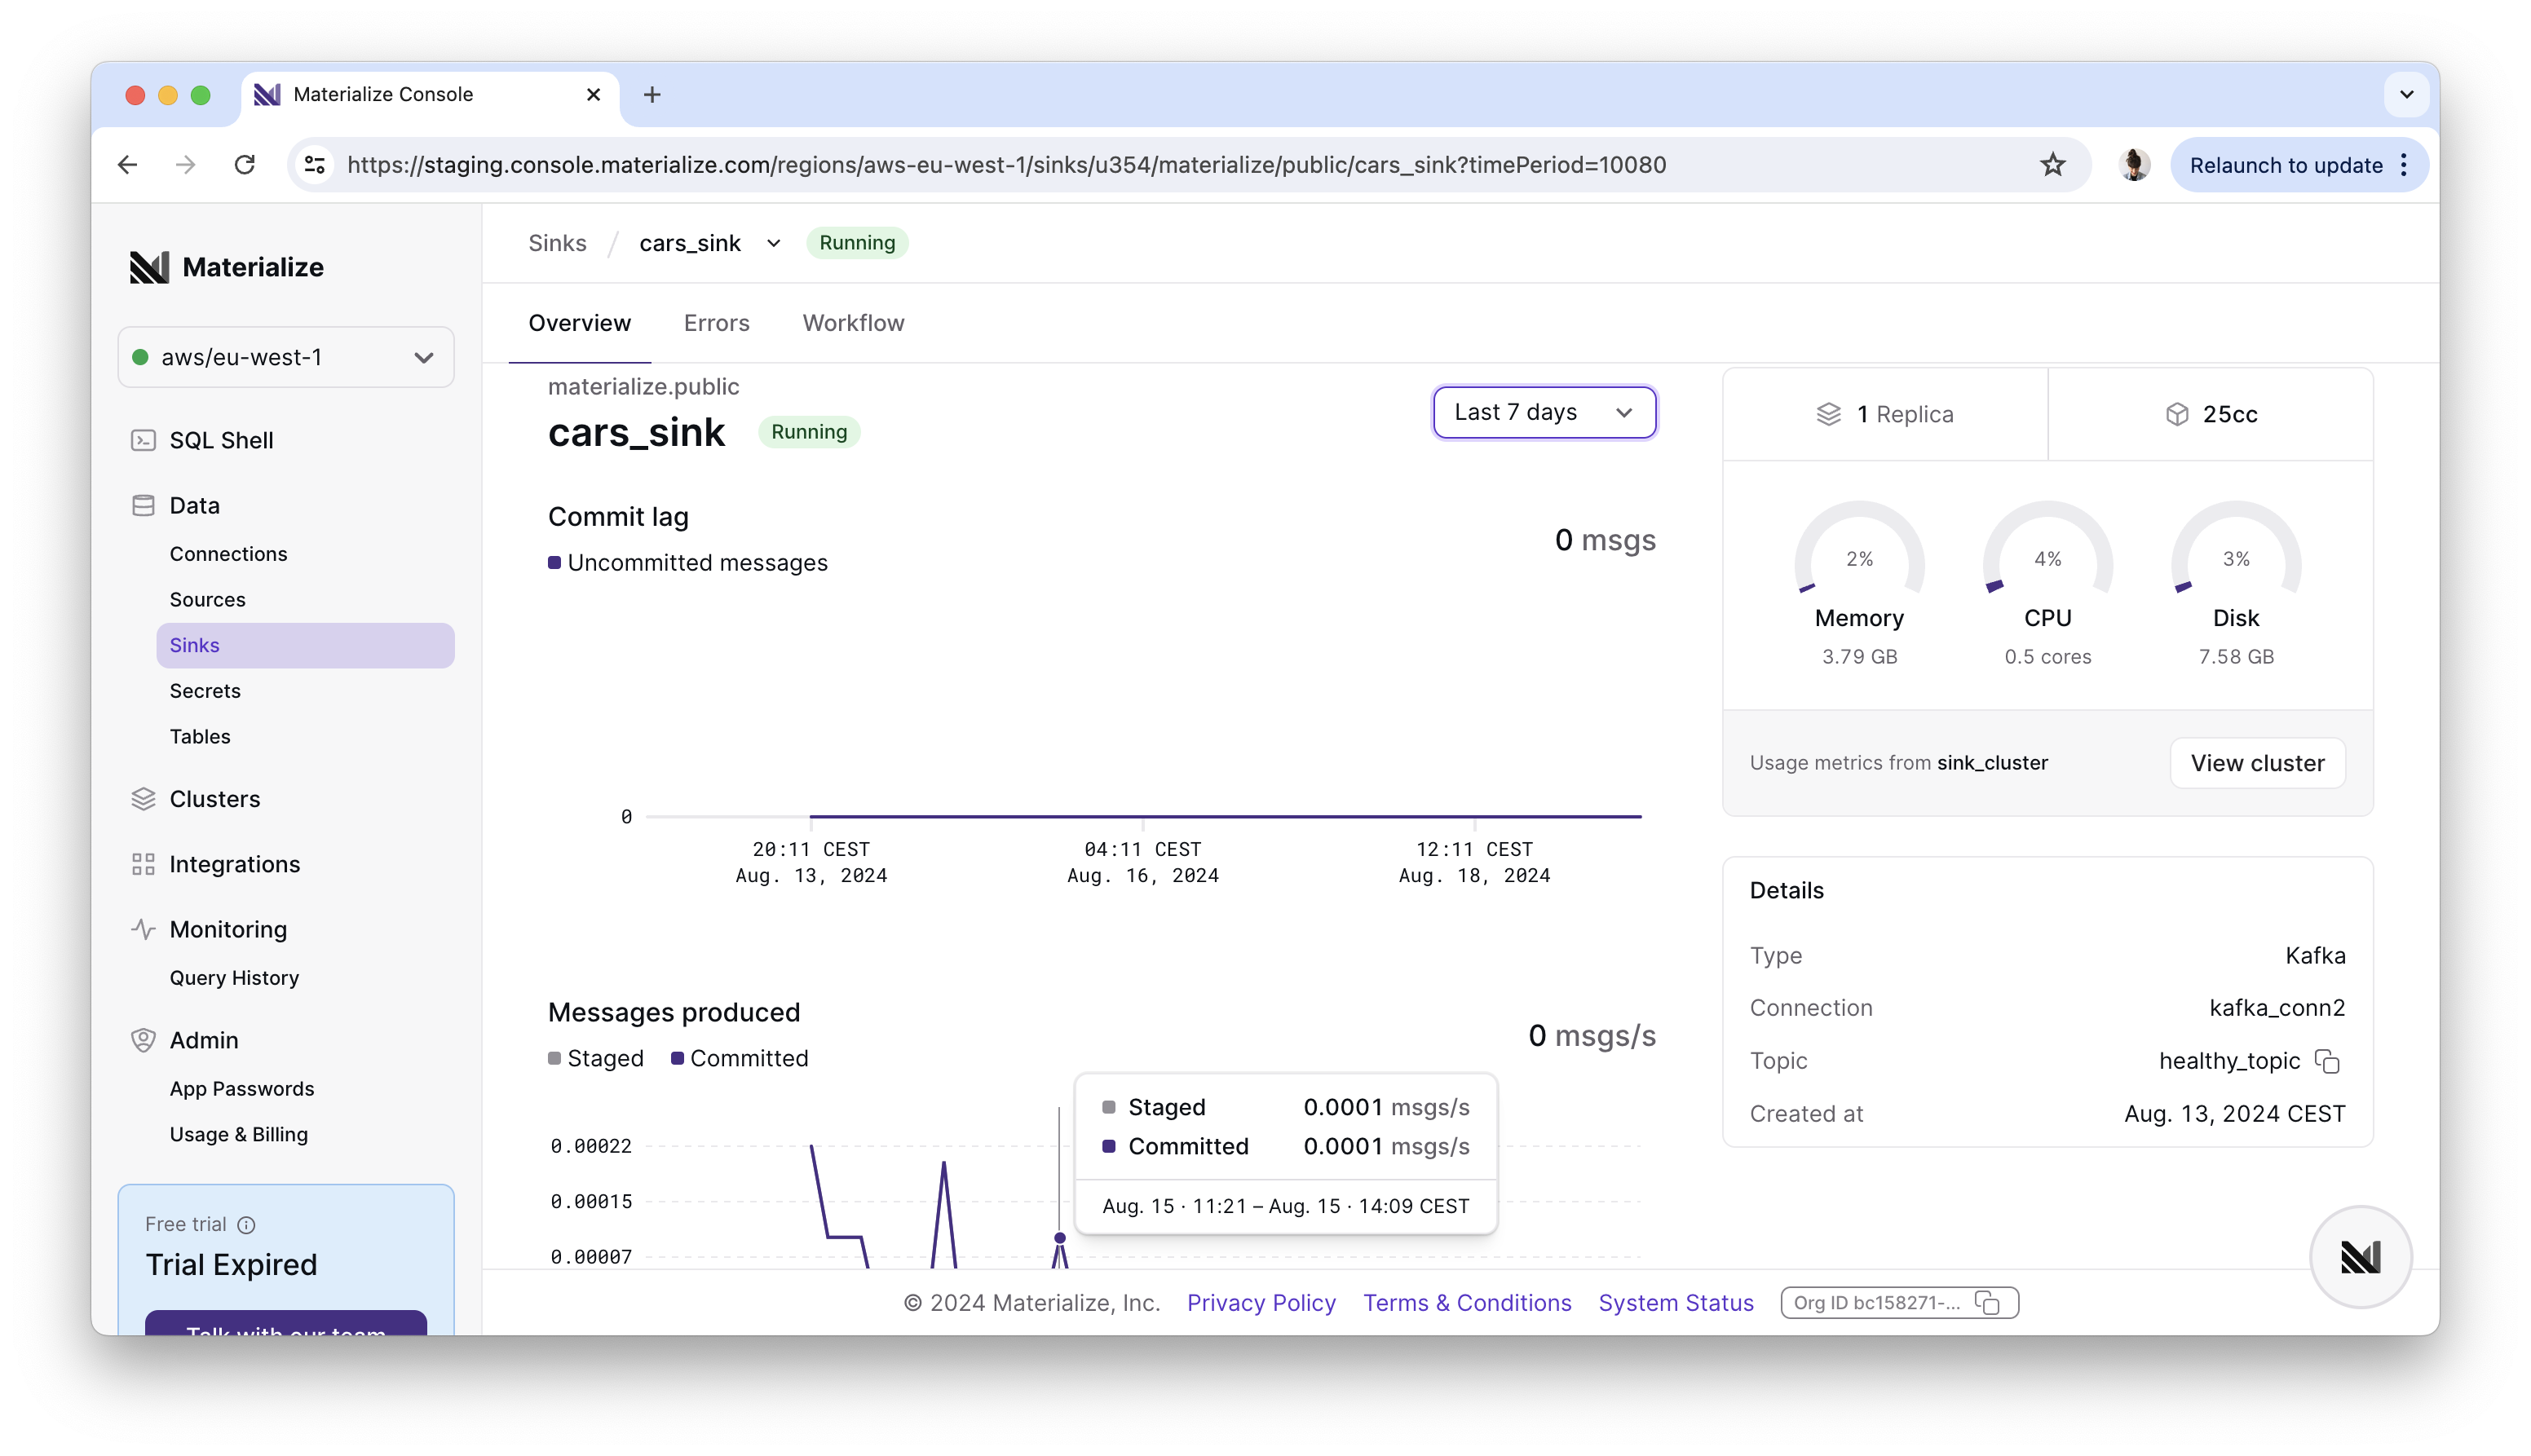
We’ll extend this overview with more details in the near future, like snapshot progress metrics, so you never miss a bit (ha!). If you have any feedback, or requests for new useful metrics, we’d love to hear about it!
Private Preview: AWS IAM authentication for Amazon MSK
important
Note: Because this feature is in Private Preview, you’ll need to ping our team on Slack to get early access. 🖖
If you’re streaming data into Materialize from an Amazon MSK cluster, you now have the option to authenticate using an AWS Identity and Access Management (IAM) role! Here’s how:
Create an AWS connection to allow Materialize to securely authenticate with your Amazon MSK cluster.
-- Replace <account-id> with the 12-digit number that identifies your AWS
-- account, and <role> with the name of the IAM role you want Materialize to
-- assume.
CREATE CONNECTION aws_msk TO AWS (
  ASSUME ROLE ARN = 'arn:aws:iam::<account-id>:role/<role>'
);
Validate the connection, to double-check that you didn’t miss any IAM configuration steps.
VALIDATE CONNECTION aws_msk;Create a Kafka connection with the access and authentication details for your Amazon MSK cluster, and use the AWS connection you just created.
CREATE CONNECTION kafka_msk TO KAFKA (
    BROKER 'msk.mycorp.com:9092',
    -- To use IAM authentication, the security protocol must be
    -- SASL_PLAINTEXT or SASL_SSL.
    SECURITY PROTOCOL = 'SASL_SSL',
    AWS CONNECTION = aws_msk
);
Depending on your security architecture, you can also use AWS IAM authentication in combination with PrivateLink connections. And yes — this feature is already supported in the Materialize Terraform provider (v0.8.7+)! 👾
Console: support for webhook source creation
We’ve made it easier to connect to webhook data sources right in the Materialize console: with just a few clicks, you can start ingesting and working with data from your SaaS applications in real-time. 💥
No SQL, no manual parsing, no nonsense.

While webhook sources have been long supported in Materialize, this new workflow simplifies steps that are otherwise a PITA to perform manually, like configuring request validation, or parsing huge JSON payloads in SQL.
Ready to get started? Sign up for a 7-day free trial of Materialize, follow our step-by-step webhooks quickstart, and elevate your business processes with the power of an operational data warehouse.
dbt adapter: support for sink cutover in blue/green deployments
The initial implementation of our automated blue/green workflow was transparent to consumers that connect directly to Materialize (e.g. your dashboards), but not to consumers depending on sinks (e.g. your applications feeding off Kafka). What happens when you’re sending data out to an external system and need to deploy schema changes?
Well, things get a little trickier. The good news is that we’re now handling the tricky parts for you in the blue/green deployment workflow, too!
Sink cutover 😱
In a nutshell: if you change the definition of the object a sink depends on, you must guarantee that it doesn’t reprocess the data that was already sent downstream and ensure continuity in data processing. That sounds…hard, right?
To solve this, we implemented a new command in Materialize that allows cutting a
sink over to a new definition of its upstream dependency without a blip (
ALTER SINK). We then embedded
this step into the existing dbt workflow, so sink cutover is seamlessly handled
when environments are swapped. There are no real changes for you, as a user,
other than the ability to also blue/green sinks using the standard set of dbt
macros:
dbt run-operation deploy_init    # Create a clone of your production environment, excluding sinks (if relevant)
dbt run --vars 'deploy: True'    # Deploy the changes to the new deployment environment
dbt run-operation deploy_await   # Wait for all objects in the deployment environment to be hydrated (i.e. lag < 1s)
                                 # Validate the results (important!)
dbt run-operation deploy_promote # Swap environments and cut sinks over to the new dependency definition (if relevant)
For a full rundown of the automated blue/green deployment workflow using dbt, check out the updated documentation.
Bonus: blue/green deployment dry runs
As we worked this change in, we thought it’d also be handy to give you a way to
double-check that the blue/green deployment workflow is going to do what you
expect it to do. To perform a dry run of the environment swap step,
and validate the sequence of commands that dbt will execute, you can now pass
the dry_run argument to the deploy_promote macro:
dbt run-operation deploy_promote --args 'dry_run: True'

10:52:30  DRY RUN: Swapping schemas public and public_dbt_deploy
10:52:30  DRY RUN: ALTER SCHEMA "public" SWAP WITH "public_dbt_deploy"
10:52:30  DRY RUN: Swapping clusters quickstart and quickstart_dbt_deploy
10:52:30  DRY RUN: ALTER CLUSTER "quickstart" SWAP WITH "quickstart_dbt_deploy"
10:52:30  DRY RUN: No actual schema or cluster swaps performed.
10:52:30  DRY RUN: ALTER SINK "materialize"."sink_schema"."sink" SET FROM materialize."public"."my_dbt_model"
Try it out!
These improvements are available in the latest version of the dbt-materialize
adapter (v1.8.2).
To upgrade, run:
pip install --upgrade dbt-materializeAs a reminder, if you’re running a pre-1.8 version of the adapter, you have to run a few extra commands to upgrade due to changes to the underlying package structure in dbt Core:
pip install --force-reinstall dbt-adapters

pip install dbt-postgres --upgrade
Have you tried out automated blue/green deployments? We’d love to hear any and all feedback on this new workflow, as well as requests for new functionality.
Native support for service accounts
Creating a service account for each application and service that you connect to
Materialize is considered a security best practice. But until now, you’ve had to
provision a real email address for each service account (e.g.,
infra+production-dashboard@foo.corp) and manually click the link in each
activation email. This friction has been one of our most reported
issues.
Today, we rolled out native support for service accounts—no email addresses required! 🎉
If you have the Organization Admin role, you can use the App Passwords page in the Materialize Console to create service-type app passwords. You choose the name of the service user at the time you create the app password:
To manage service accounts with code, you can use our Terraform provider to create service accounts. Here’s an example of how you might provision a service account and appropriate privileges for a dashboard application using Terraform:
# Create the service user for the dashboard in the aws/us-east-1 region.
resource "materialize_role" "production_dashboard" {
  name   = "svc_production_dashboard"
  region = "aws/us-east-1"
}

# Allow the dashboard user to use the "production_analytics" database.
resource "materialize_database_grant" "database_usage" {
  role_name     = materialize_role.production_dashboard.name
  privilege     = "USAGE"
  database_name = "production_analytics"
  region        = "aws/us-east-1"
}

# Create an app password for the dashboard user.
resource "materialize_app_password" "production_dashboard" {
  name = "production_dashboard_app_password"
  # The following fields are new in v0.8.1.
  type = "service"
  user = materialize_role.production_dashboard.name
  roles = ["Member"]
}

# Export the user and password for use in the dashboarding tool.
output "production_dashboard_user" {
  value = materialize_role.production_dashboard.name
}
output "production_dashboard_password" {
  value = materialize_app_password.production_dashboard.password
}
You’ll need to be running v0.8.1 or later of the provider to be able to run the above example.
Private Preview: S3 bulk exports ❄️
If you’re using Materialize to serve up-to-date query results to your users or applications as new data flows in from your production systems, chances are that you’ll want to incoporate these results into your heavy-duty analytical workloads…at some point.
To easily pipe results from Materialize to wherever else you need them, you can now trigger bulk exports to object storage, starting with Amazon S3! This is useful to perform tasks like periodic backups for auditing, and additional downstream processing in analytical data warehouses like Snowflake, Databricks or BigQuery.
How does it work?
We’ve extended the COPY TO command
to work as a “one-shot sink” that can (efficiently) write files to an S3 path in
your AWS account. All you need is to:
1. Create an AWS connection to allow Materialize to securely authenticate with your S3 service:
CREATE CONNECTION aws_conn TO AWS (
  ASSUME ROLE ARN = 'arn:aws:iam::001234567890:role/MZS3Exporter'
);
2. Double-check that you didn’t miss any IAM configuration steps (🙋♀️):
VALIDATE CONNECTION aws_conn;3. And then trigger the copy command with either the object or the query for which you want results to be exported:
COPY my_view TO 's3://mz-to-snow/202406030/'
  WITH (
    AWS CONNECTION = aws_conn,
    FORMAT = 'parquet'
  );
That’s it!
From here, you can use the file(s) as you please! One last note: in the first iteration of bulk exports, you can export results as CSV- or Parquet-formatted files. In the future, we plan to extend support to table formats like Apache Iceberg or Delta Lake.
How do you get started?
For an overview of what is and isn’t supported in Private Preview, check out the reference documentation for bulk exports, and the first of many integration guides: Snowflake (via S3).
Because this feature is in Private Preview, you’ll need to ping our team on Slack to get early access. If you have any feedback, or just suggestions about how this feature could be the most useful to your use case, we’d absolutely love to hear about it!
dbt adapter: unit tests are here! 🥲
dbt has brought data work closer to software engineering practices, but one workflow has remained a challenge for SQL users: unit testing. While dbt data tests allow you to validate the quality of your data, they can’t really help guarantee that changes to your logic will produce the results you expect when faced with specific input scenarios.
With the dbt-materialize v1.8.0 release, you can now use dbt
unit tests to validate
your SQL logic without fully materializing a model, and future-proof it against
edge cases!
How does it work?
Let’s assume you have the following models in dbt:
-- models/my_model_a.sql
SELECT
  1 AS a,
  1 AS id,
  2 AS not_testing,
  'a' AS string_a,
DATE '2020-01-02' AS date_a-- models/my_model_b.sql
SELECT
2 as b,
1 as id,
2 as c,
'b' as string_b-- models/my_model.sql
SELECT
a+b AS c,
CONCAT(string_a, string_b) AS string_c,
not_testing,
date_a
FROM {{ ref('my_model_a')}} my_model_a
JOIN {{ ref('my_model_b' )}} my_model_b
ON my_model_a.id = my_model_b.idUnit tests are defined in (you’ve guessed it) a YAML file under the /models
directory, and allow you to specify a set of input rows (given), and the
corresponding expected output rows (expect):
unit_tests:
  - name: test_my_model
    model: my_model
    given:
      - input: ref('my_model_a')
        rows:
          - {id: 1, a: 1}
      - input: ref('my_model_b')
        rows:
          - {id: 1, b: 2}
          - {id: 2, b: 2}
    expect:
      rows:
        - {c: 2}
important
Note: The tests property has been deprecated in favour of data_tests
(to accomodate the new unit_tests property) and will be removed in a future
dbt release. You should adapt your data tests to use the new nomenclature! 🖖
You can then run your unit tests using dbt test, or implicitly as part of dbt build (when the upstream dependencies of the model being tested don’t yet
exist in the database):
dbt build --select "+my_model.sql"

11:53:30  Running with dbt=1.8.0
11:53:30  Registered adapter: materialize=1.8.0
...
11:53:33  2 of 12 START sql view model public.my_model_a ................................. [RUN]
11:53:34  2 of 12 OK created sql view model public.my_model_a ............................ [CREATE VIEW in 0.49s]
11:53:34  3 of 12 START sql view model public.my_model_b ................................. [RUN]
11:53:34  3 of 12 OK created sql view model public.my_model_b ............................ [CREATE VIEW in 0.45s]
...
11:53:35  11 of 12 START unit_test my_model::test_my_model ............................... [RUN]
11:53:36  11 of 12 FAIL 1 my_model::test_my_model ........................................ [FAIL 1 in 0.84s]
11:53:36  Failure in unit_test test_my_model (models/models/unit_tests.yml)
11:53:36

actual differs from expected:

@@ ,c
+++,3
---,2
Unit tests can be a quicker way to iterate on model development in comparison to re-running the models, since you don’t need to wait for a model to hydrate before you can validate that it produces the expected results.
How can you upgrade?
To upgrade to the latest version of dbt-materialize, run:
pip install --upgrade dbt-materializeIt’s important to note that the latest dbt release included a hefty restructure
of its underlying package structure, so it’s possible that you run into errors
like ModuleNotFoundError: No module named 'dbt.adapters.factory' after
running the upgrade command. If that’s the case, try running:
pip install --force-reinstall dbt-adapters, and refer to dbt-core #10135
for additional troubleshooting and support!
Spill-to-disk, new cluster sizes and names
Clusters are the heart of Materialize - an isolated pool of compute resources dedicated to your real-time operational workloads. Today, we’re unveiling the latest enhancements to Materialize clusters to help you better tailor your compute resources to satisfy the demands of your workloads.
These enhancements include:
- Spill-to-disk capability that automatically offloads processing to disk to efficiently handle larger workloads without being constrained by available memory.

New intermediate sizes that give you the flexibility to right-size clusters running workloads of any size.
New names to make it easier for you to correlate a cluster’s compute resources and its cost.

Our Engineering Manager Paul Hemberger shares more insights in his blog on how all this came together.
dbt adapter: automated blue/green deployments
ICYMI: we’ve been working on supporting blue/green deployments in Materialize, which allow you to deploy schema changes to production without downtime. Now — safely cutting over to a new version of your data model in a continually running system takes a non-trivial amount of coordination…and we wouldn’t want to burden you with that.
To make blue/green deployments easier to manage, we built the workflow
into the dbt-materialize adapter.
important
Note: The latest release of dbt-materialize (v1.7.6), which allows
including sources in blue/green deployments, introduced a breaking change
to the syntax of source and sink materializations. You must migrate your
models to the new syntax before upgrading! ✋
Blue/green deployment workflow
As a recap: in a blue/green deployment, you first deploy your code changes to a
deployment environment (green) that is a clone of your production
environment (blue), so you can validate the results without causing
unavailability. These environments are later swapped transparently.
We baked each step of this workflow into dbt macros that you can invoke in sequence to perform a deployment:
dbt run-operation deploy_init    # Create a clone of your production environment
dbt run --vars 'deploy: True'    # Deploy the changes to the new deployment environment
dbt run-operation deploy_await   # Wait for all objects in the deployment environment to be hydrated (i.e. lag < 1s)
                                 # Validate the results (important!)
dbt run-operation deploy_promote # Swap environments
Behind the scenes, these macros take care of details like preserving object permissions, preventing against possibly destructive changes (e.g. cutting over too soon, concurrent operations), and letting you know when it’s safe to promote your changes. For a full rundown of the workflow, and each workflow step, check out the brand new dbt development guide in the Materialize documentation!
Breaking change: new syntax for source and sink models
To allow including sources in the blue/green deployment workflow, we finally
came around to making the syntax of source (and sink) materializations a
little uglier, but much more consistent with the other materialization types.
The new syntax omits the CREATE { SOURCE | SINK } clause, and now accepts
configuration options like cluster (🤝).
Please adjust your models accordingly before upgrading to the latest version of
the dbt-materialize adapter (v1.7.6)!
New syntax
{{ config(
     materialized='source',
     cluster='quickstart'
   ) }}
FROM KAFKA CONNECTION kafka_connection (TOPIC 'test-topic')
FORMAT BYTES
Old syntax
{{ config(
     materialized='source'
   ) }}
CREATE SOURCE {{ this }} IN CLUSTER 'quickstart'
FROM KAFKA CONNECTION kafka_connection (TOPIC 'test-topic')
FORMAT BYTES
To upgrade, run:
pip install --upgrade dbt-materialize`And remember to migrate your source and sink models! If you have any
feedback on this new workflow, or requests for new features, ping our team on Slack. 🫡
New source overview UI ✨
We’ve made it easier to keep a pulse on the health of your sources right in the
web console: instead of running lengthy introspection queries by hand, you can
now monitor ingestion progress (or lack thereof) and cluster resource
utilization using the new Overview page in the Sources navigation tab.
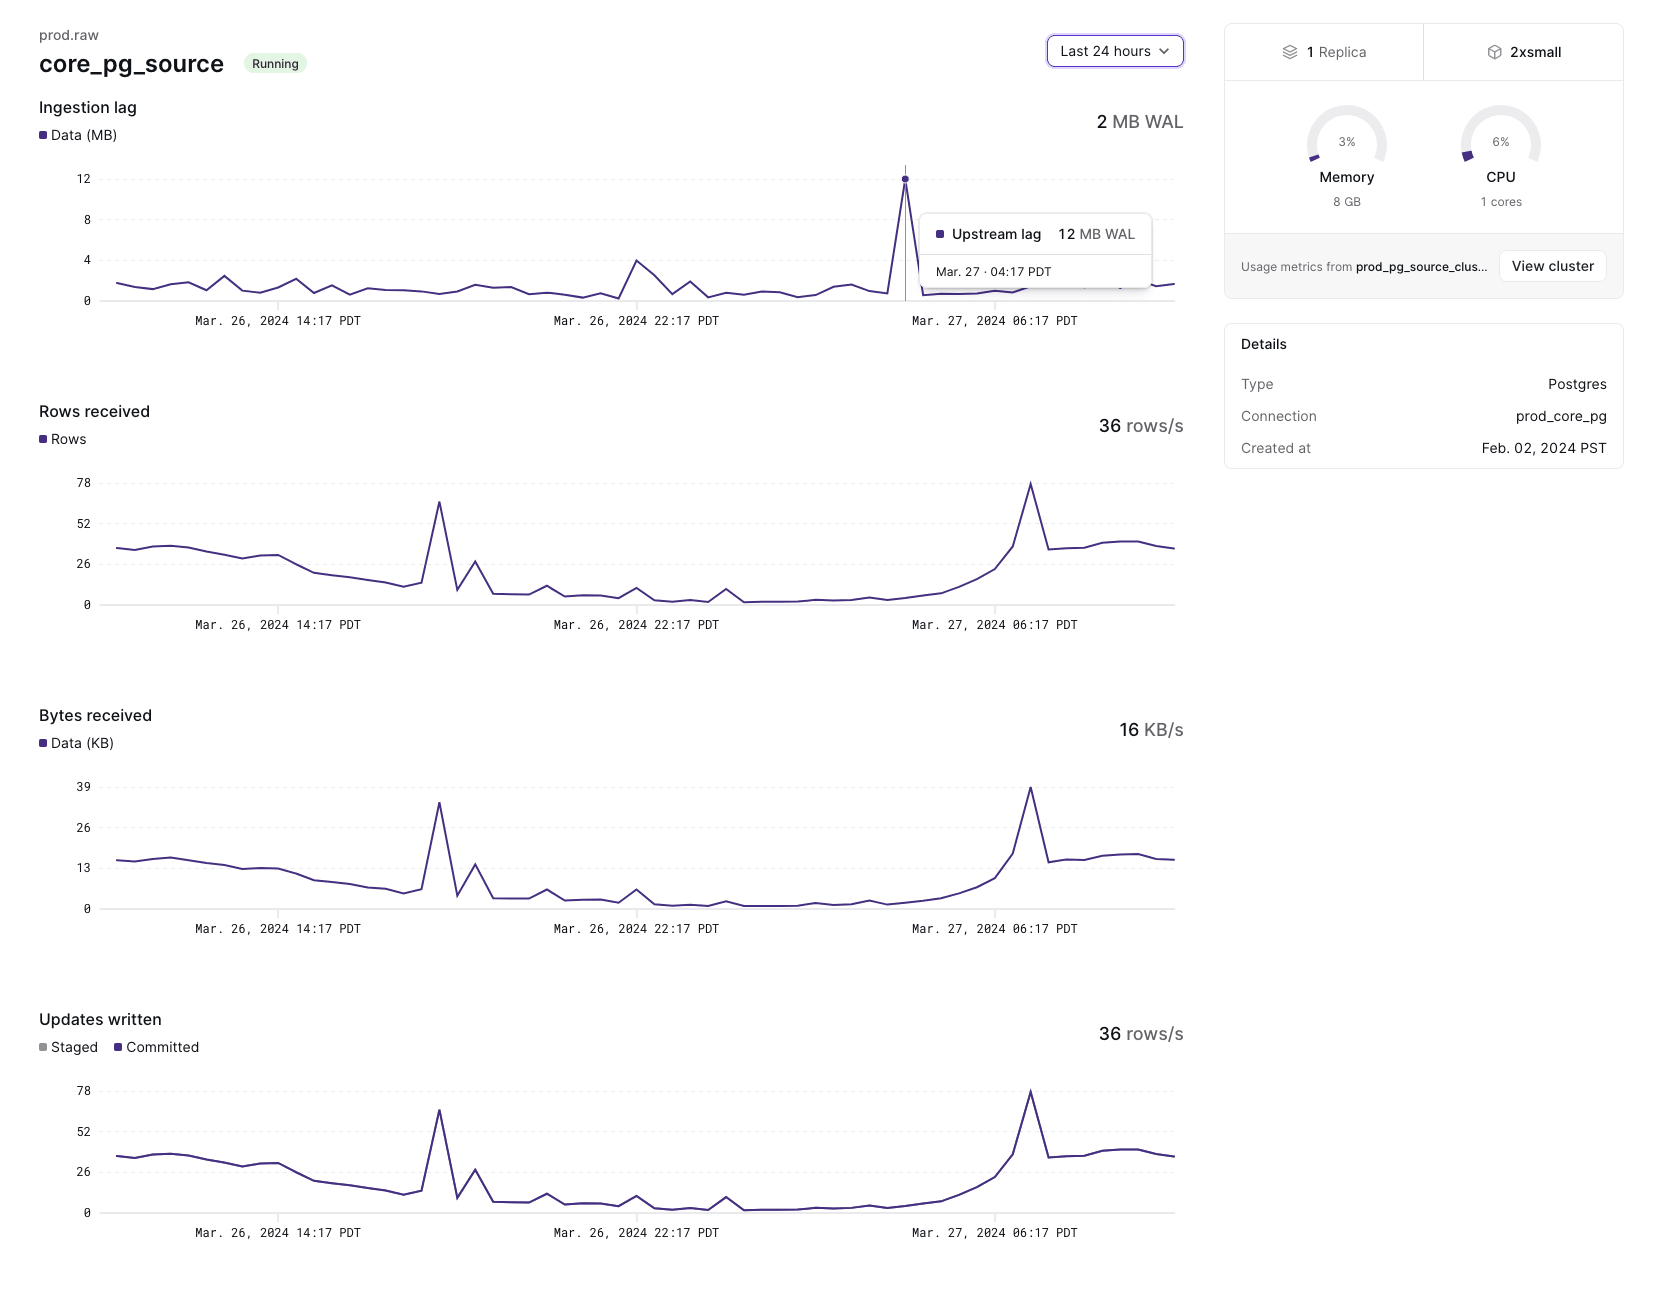
We’ll extend this overview with more details in the near future, like snapshot progress metrics, so you never miss a bit (ha!). If you have any feedback, or requests for new useful metrics, we’d love to hear about it!
Private Preview: MySQL source
Today, we’re dialing up the number of native CDC sources to two with the release of a shiny new MySQL source! 🐬 The new source allows you to replicate data from your MySQL database to Materialize in real-time, and start building interactive data apps, better customer experiences, and other use cases ripe for fresh data.
How does it work?
The source uses MySQL’s binlog replication protocol to continually ingest
changes resulting from INSERT, UPDATE and DELETE operations in your
upstream database. As a MySQL user, this comes with a few benefits:
No additional infrastructure: ingest MySQL change data into Materialize in real-time with no architectural changes or additional operational overhead.
Transactional consistency: we’re all about correctness, so the new source ensures that transactions in MySQL are respected downstream. Materialize will never show partial results based on partially replicated transactions.
Incrementally updated materialized views: materialized views are not supported in (vanilla) MySQL, so you can use Materialize as a read-replica to build views on top of your MySQL data that are efficiently maintained and always up-to-date.
How do you get started?
Once you configure your upstream database for replication, setting up a MySQL source in Materialize really just takes three SQL statements:
CREATE SECRET mysqlpass AS '<MYSQL_PASSWORD>';

CREATE CONNECTION mysql_connection TO MYSQL (
    HOST 'instance.foo000.us-west-1.rds.amazonaws.com',
    PORT 3306,
    USER 'materialize',
    PASSWORD SECRET mysqlpass
);

CREATE SOURCE mz_source
  FROM MYSQL CONNECTION mysql_connection
  FOR ALL TABLES;
We aim to bring this down to zero SQL statements by supporting MySQL source creation in the Materialize console soon! For an overview of what is and isn’t supported in Private Preview, as well as integration guides for common MySQL managed services, check out the documentation.
Ready to give it a go? Sign up for a 14-day free trial of Materialize, and ping our team on Slack to get early access to the feature!
New integrations gallery 🔌
No data warehouse is an island, and Materialize is no different. To allow you to more easily browse the ecosystem of tools that integrate well with Materialize, we just shipped an integrations gallery to the web console!
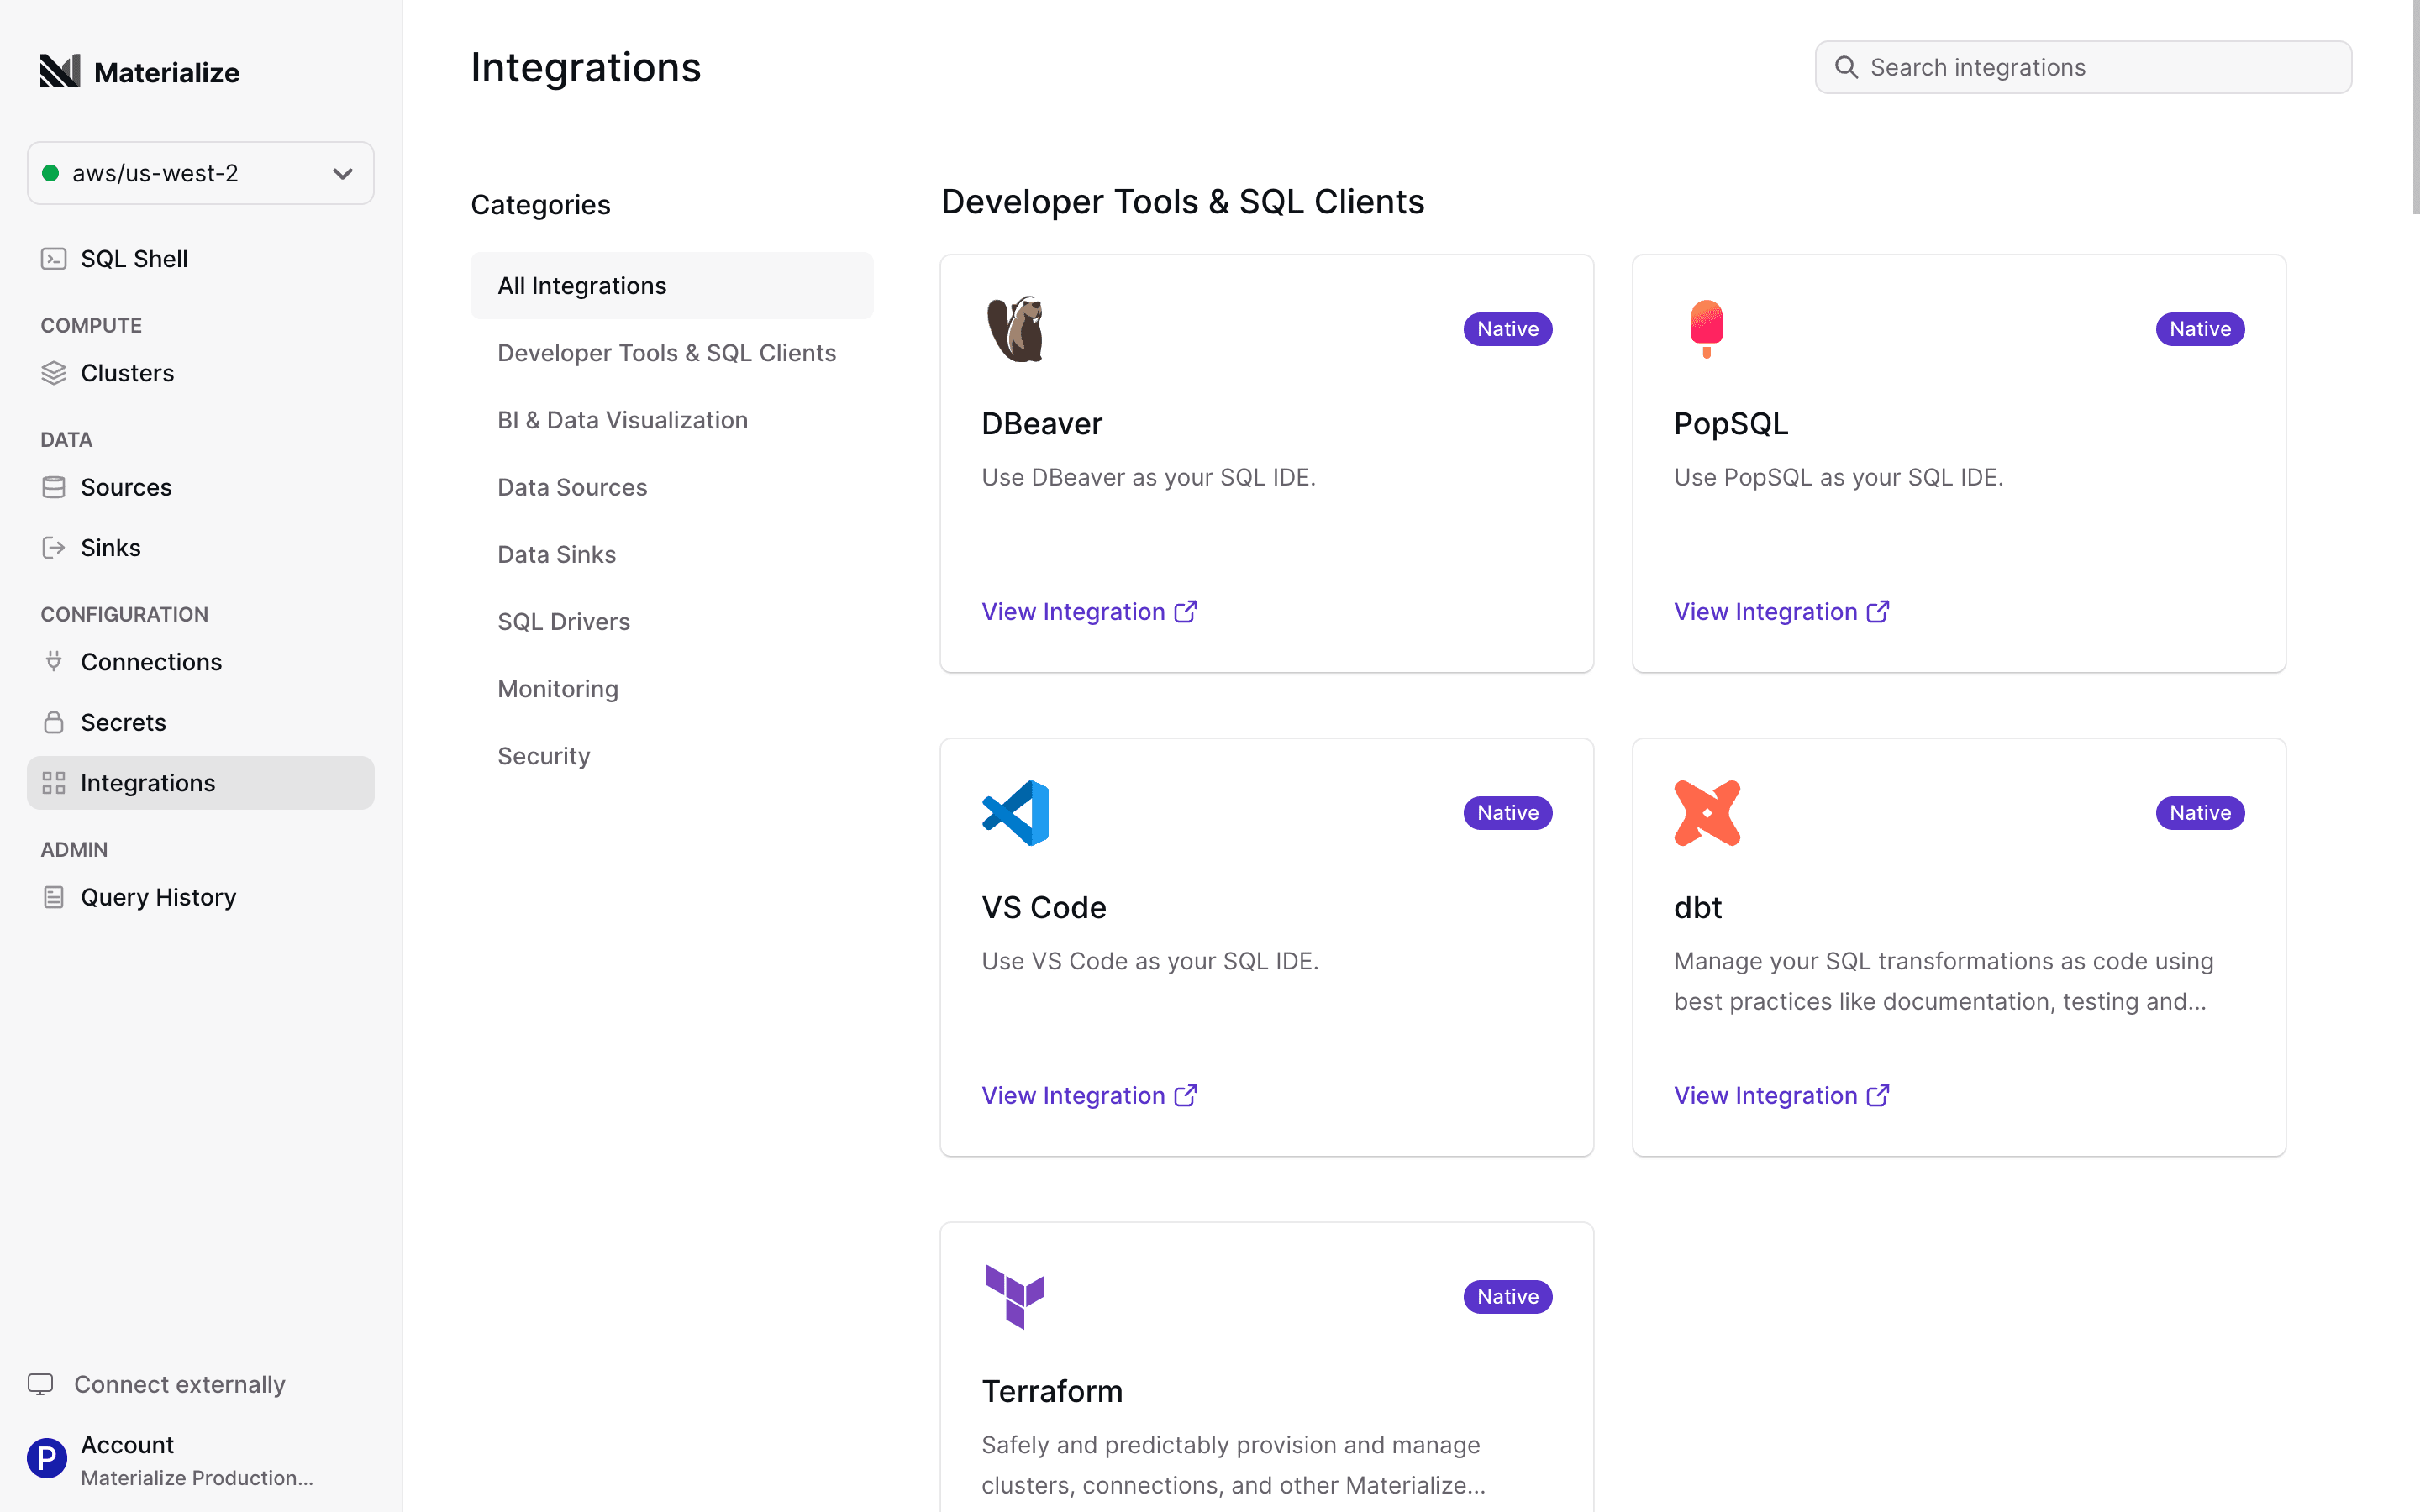
Each integration points to a documentation guide with step-by-step instructions to walk you through getting started. Not sure where to start? Here’s a quick roundup of some of the tools we support and love:
The
dbt-materializeadapter, which allows you to manage your SQL transformations as code using best practices like documentation, testing and version control.The Materialize Terraform provider, which allows you to safely and predictably provision and manage clusters, connections, and other Materialize resources as code.
Major managed PostgreSQL services, like Amazon RDS, Google Cloud SQL or AzureDB, which allow you to ingest data in real-time using Change Data Capture (CDC).
Real-time friendly BI tools like Metabase, and interactive data notebooks like Hex or Deepnote.
And many more! From message brokers to real-time reverse ETL, we’ve got you covered. If you have any feedback, or requests for new integrations, we’d love to hear about it!
Usage & Billing
Usage & Billing is now available in the admin section of the Console! This feature provides full visibility into usage and cost trends.
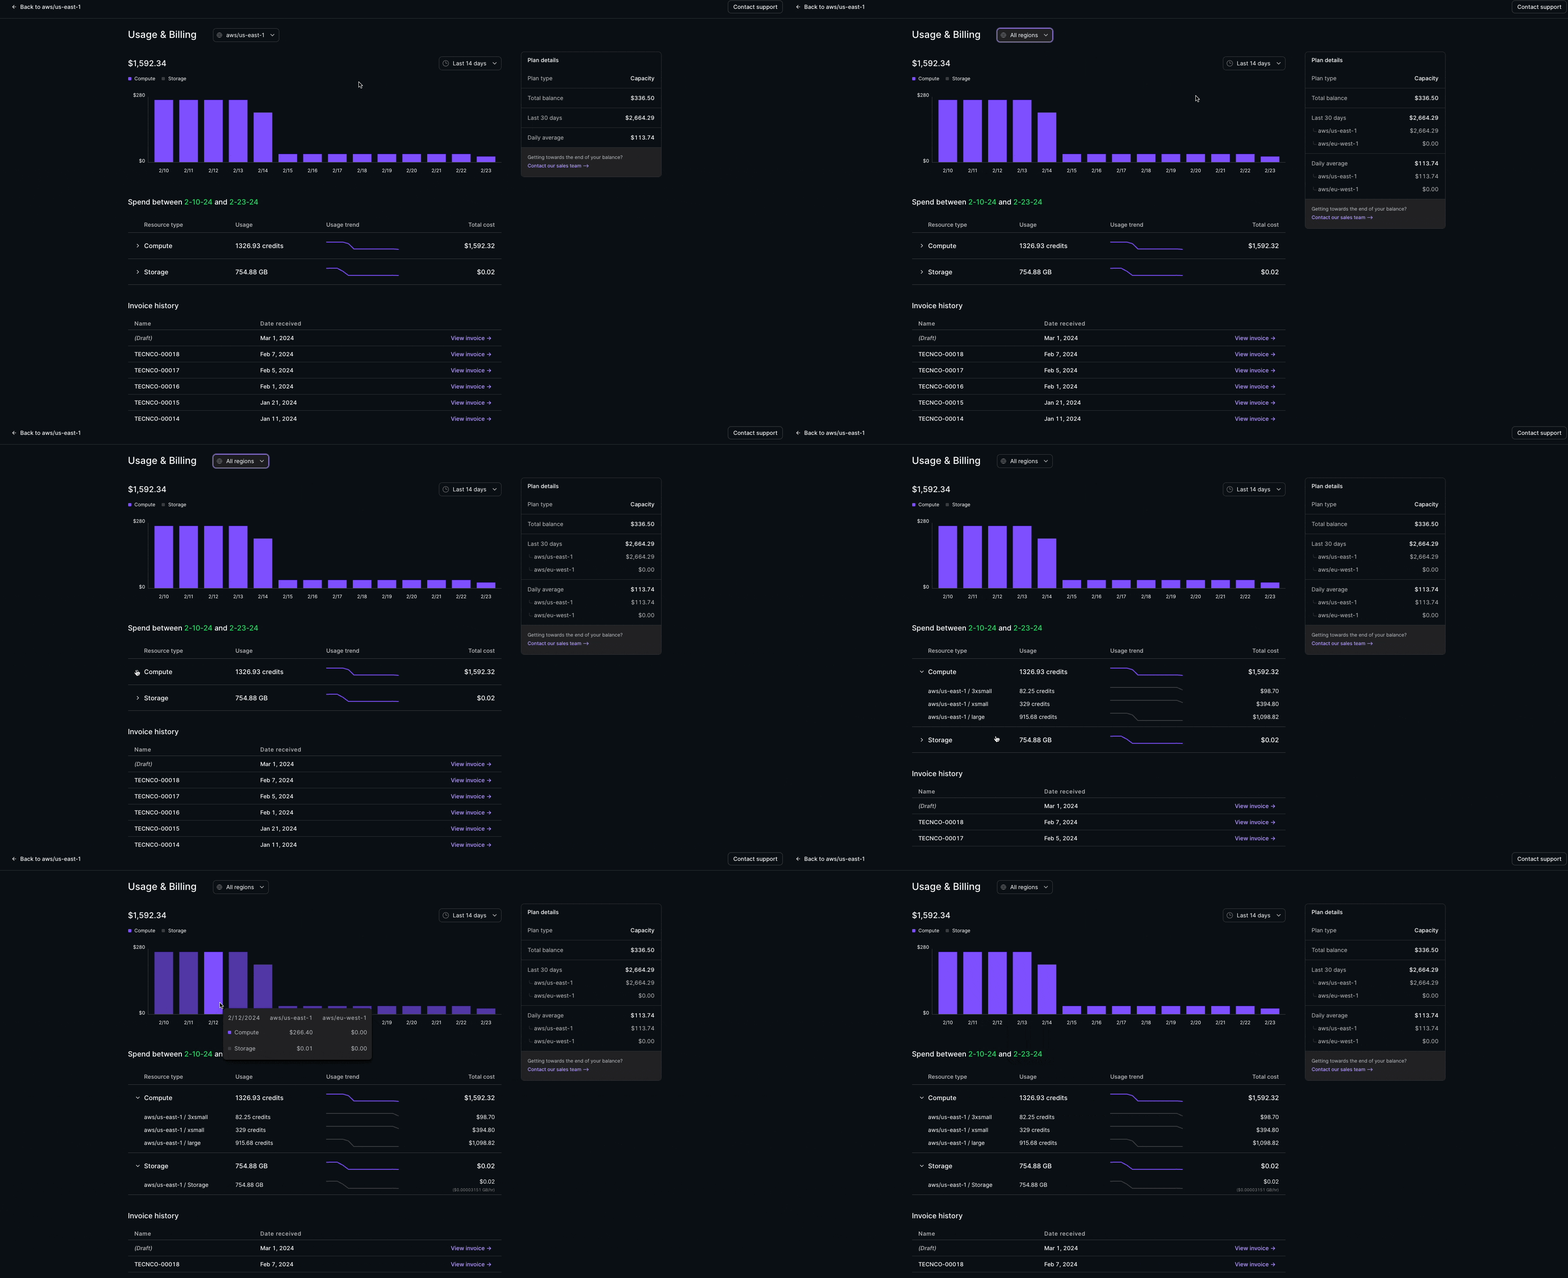
The Usage & Billing page provides a complete view into:
- Compute and Storage consumption
- Dollar and usage-based spend patterns
- Capacity balance
- Current and past monthly invoices
This feature is available for Organization Admin roles on all paid Materialize plans.
Query History 🔍
We’ve added a modern interface to the Console for monitoring your query performance: Query History!
Now you can instantly answer questions about your SQL queries, such as:
- How long is a particular query taking?
- Which users or clusters are issuing the most expensive queries and when?
- Which applications are requesting slow running queries?
- Has my query errored or completed? Or is it still running?
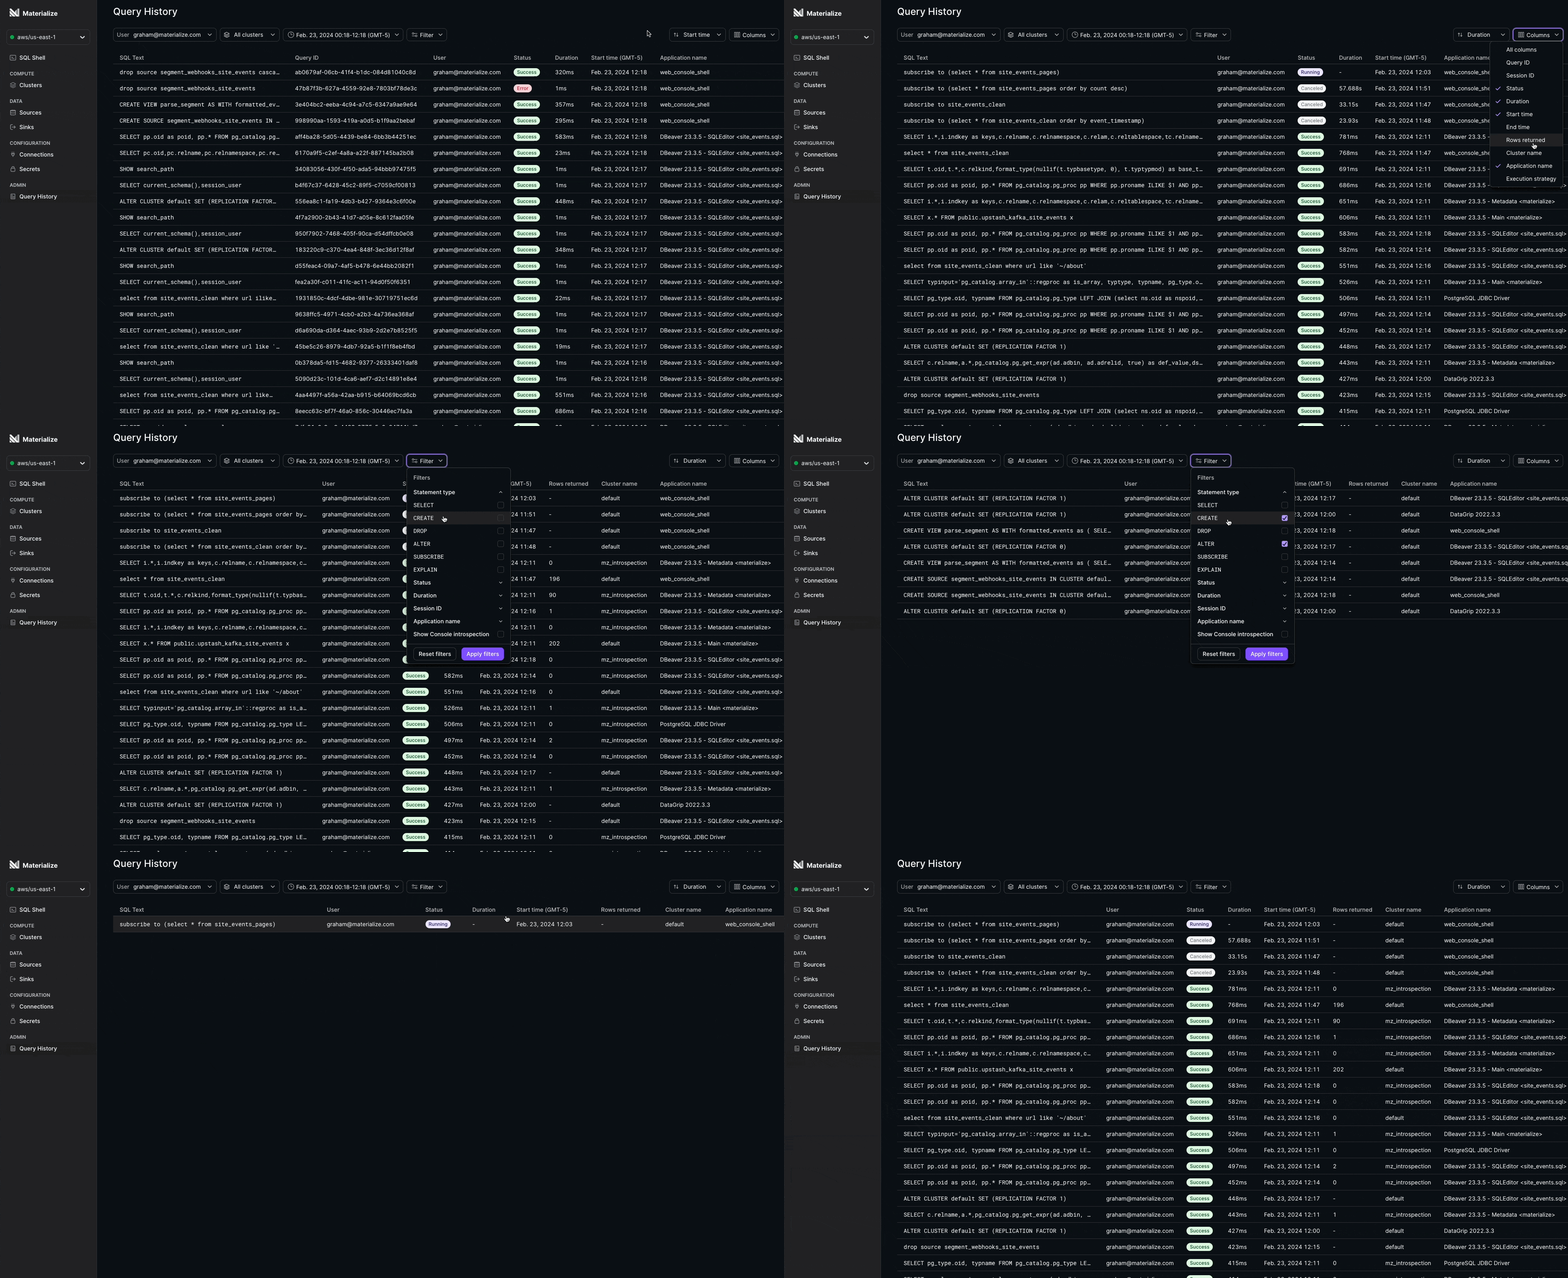
Query History is built on mz_recent_activity_log to always deliver insights fast.
This feature is currently in Private Preview and is available for Organization Admin and mz_monitor roles. Contact your account team to request early access.
Webhook source: support for batched events
Many SaaS applications support webhooks as a way to push events to other applications (like Materialize) as they occur. To maximize the volume of events that can be sent at once, it’s common for these applications to batch multiple events into a single network request — and we strive to support what’s common!
The webhook source can now automatically unwrangle batched events in the following formats:
JSON arrays
If you’re expecting events batched as a JSON array, use BODY FORMAT JSON ARRAY. Each object will be appended to the source as an individual row.
CREATE SOURCE webhook_json_array IN CLUSTER quickstart FROM WEBHOOK
BODY FORMAT JSON ARRAY;

-- Send multiple events in a JSON array to the webhook source.
HTTP POST TO 'webhook_json_array'
  [
    { 'event_type': 'a' },
    { 'event_type': 'b' },
    { 'event_type': 'c' }
  ]

-- 🎉
SELECT COUNT(*) FROM webhook_json_array;
3
Newline-delimited JSON (aka NDJSON)
If you’re expecting events batched as NDJSON, use BODY FORMAT JSON as you
would otherwise! Each object will be appended to the source as an individual
row.
CREATE SOURCE webhook_json IN CLUSTER quickstart FROM WEBHOOK
BODY FORMAT JSON;

-- Send multiple events delimited by newlines to the webhook source.
HTTP POST to 'webhook_json'
  { 'event_type': 'foo' }
  { 'event_type': 'bar' }

-- 🎉
SELECT COUNT(*) FROM webhook_json;
2
Besides making webhook ingestion more ergonomic, this change also allows you to take advantage of performance optimizations like temporal filter pushdown.
Configurable defaults for configuration parameters
There are details in your Materialize development workflow that you shouldn’t have to remember: the namespace or cluster you connect to by default is one of them.
To save you the hassle, it’s now possible to configure defaults for
configuration parameters
for a role using the new ALTER ROLE...SET
command. This also allows you to ensure that external tools that connect
to Materialize using non-native connectors use the right connection
parameters!
-- Say an admin configured the default cluster for **all** users to be
-- queries_brr.
SHOW cluster;

 cluster
------------
 queries_brr

-- As a forgetful dev, you can set your day-to-day development cluster to a
-- different default.
ALTER ROLE forgetful_dev SET cluster TO queries_dev;

-- Whenever you start a new SQL session (and only then!), you'll see that the
-- change was picked up.
SHOW cluster;

 cluster
------------
 queries_dev
If you’re a superuser, you can modify these defaults globally using the
ALTER SYSTEM...SET
command.
-- Important things changed, and you don't want users connecting to queries_brr
-- by default anymore? Change it for everyone at once!
ALTER SYSTEM SET cluster TO queries_skrrtt;Cluster unification
Clusters are such an integral part of Materialize that we want to make sure you think about them as little as possible. 🧠 Over the past few months, we’ve worked on making clusters more flexible and unopinionated about what runs on them (aka cluster unification). For you, as a Materialize user, this means two things:
Depending on the characteristics of your workload, you now have the option to manage all types of objects in the same cluster. This gives you more control over capacity planning, and smooths out the experience of onboarding new users to your Materialize organization. We still recommend using separate clusters to manage ingestion and compute — but that’s a feature, not a bug now!
Although sources and sinks must be associated with a cluster, if you don’t explicitly specify one using the
IN CLUSTERclause on creation, the objects will now be created in the active cluster for the session.--Create the object in a specific cluster CREATE SOURCE json_source IN CLUSTER some_cluster FROM KAFKA CONNECTION kafka_connection (TOPIC 'ch_anges') FORMAT JSON; --Create the object in the active cluster CREATE SOURCE json_source FROM KAFKA CONNECTION kafka_connection (TOPIC 'ch_anges') FORMAT JSON; ```
If you’re just getting started, this also means that you no longer have to learn
about cluster specifics as the Materialize 101. Off the bat, new Materialize
regions include a default cluster named quickstart,
which does what it says on the tin: give you resources to just start building.
SCIM provisioning
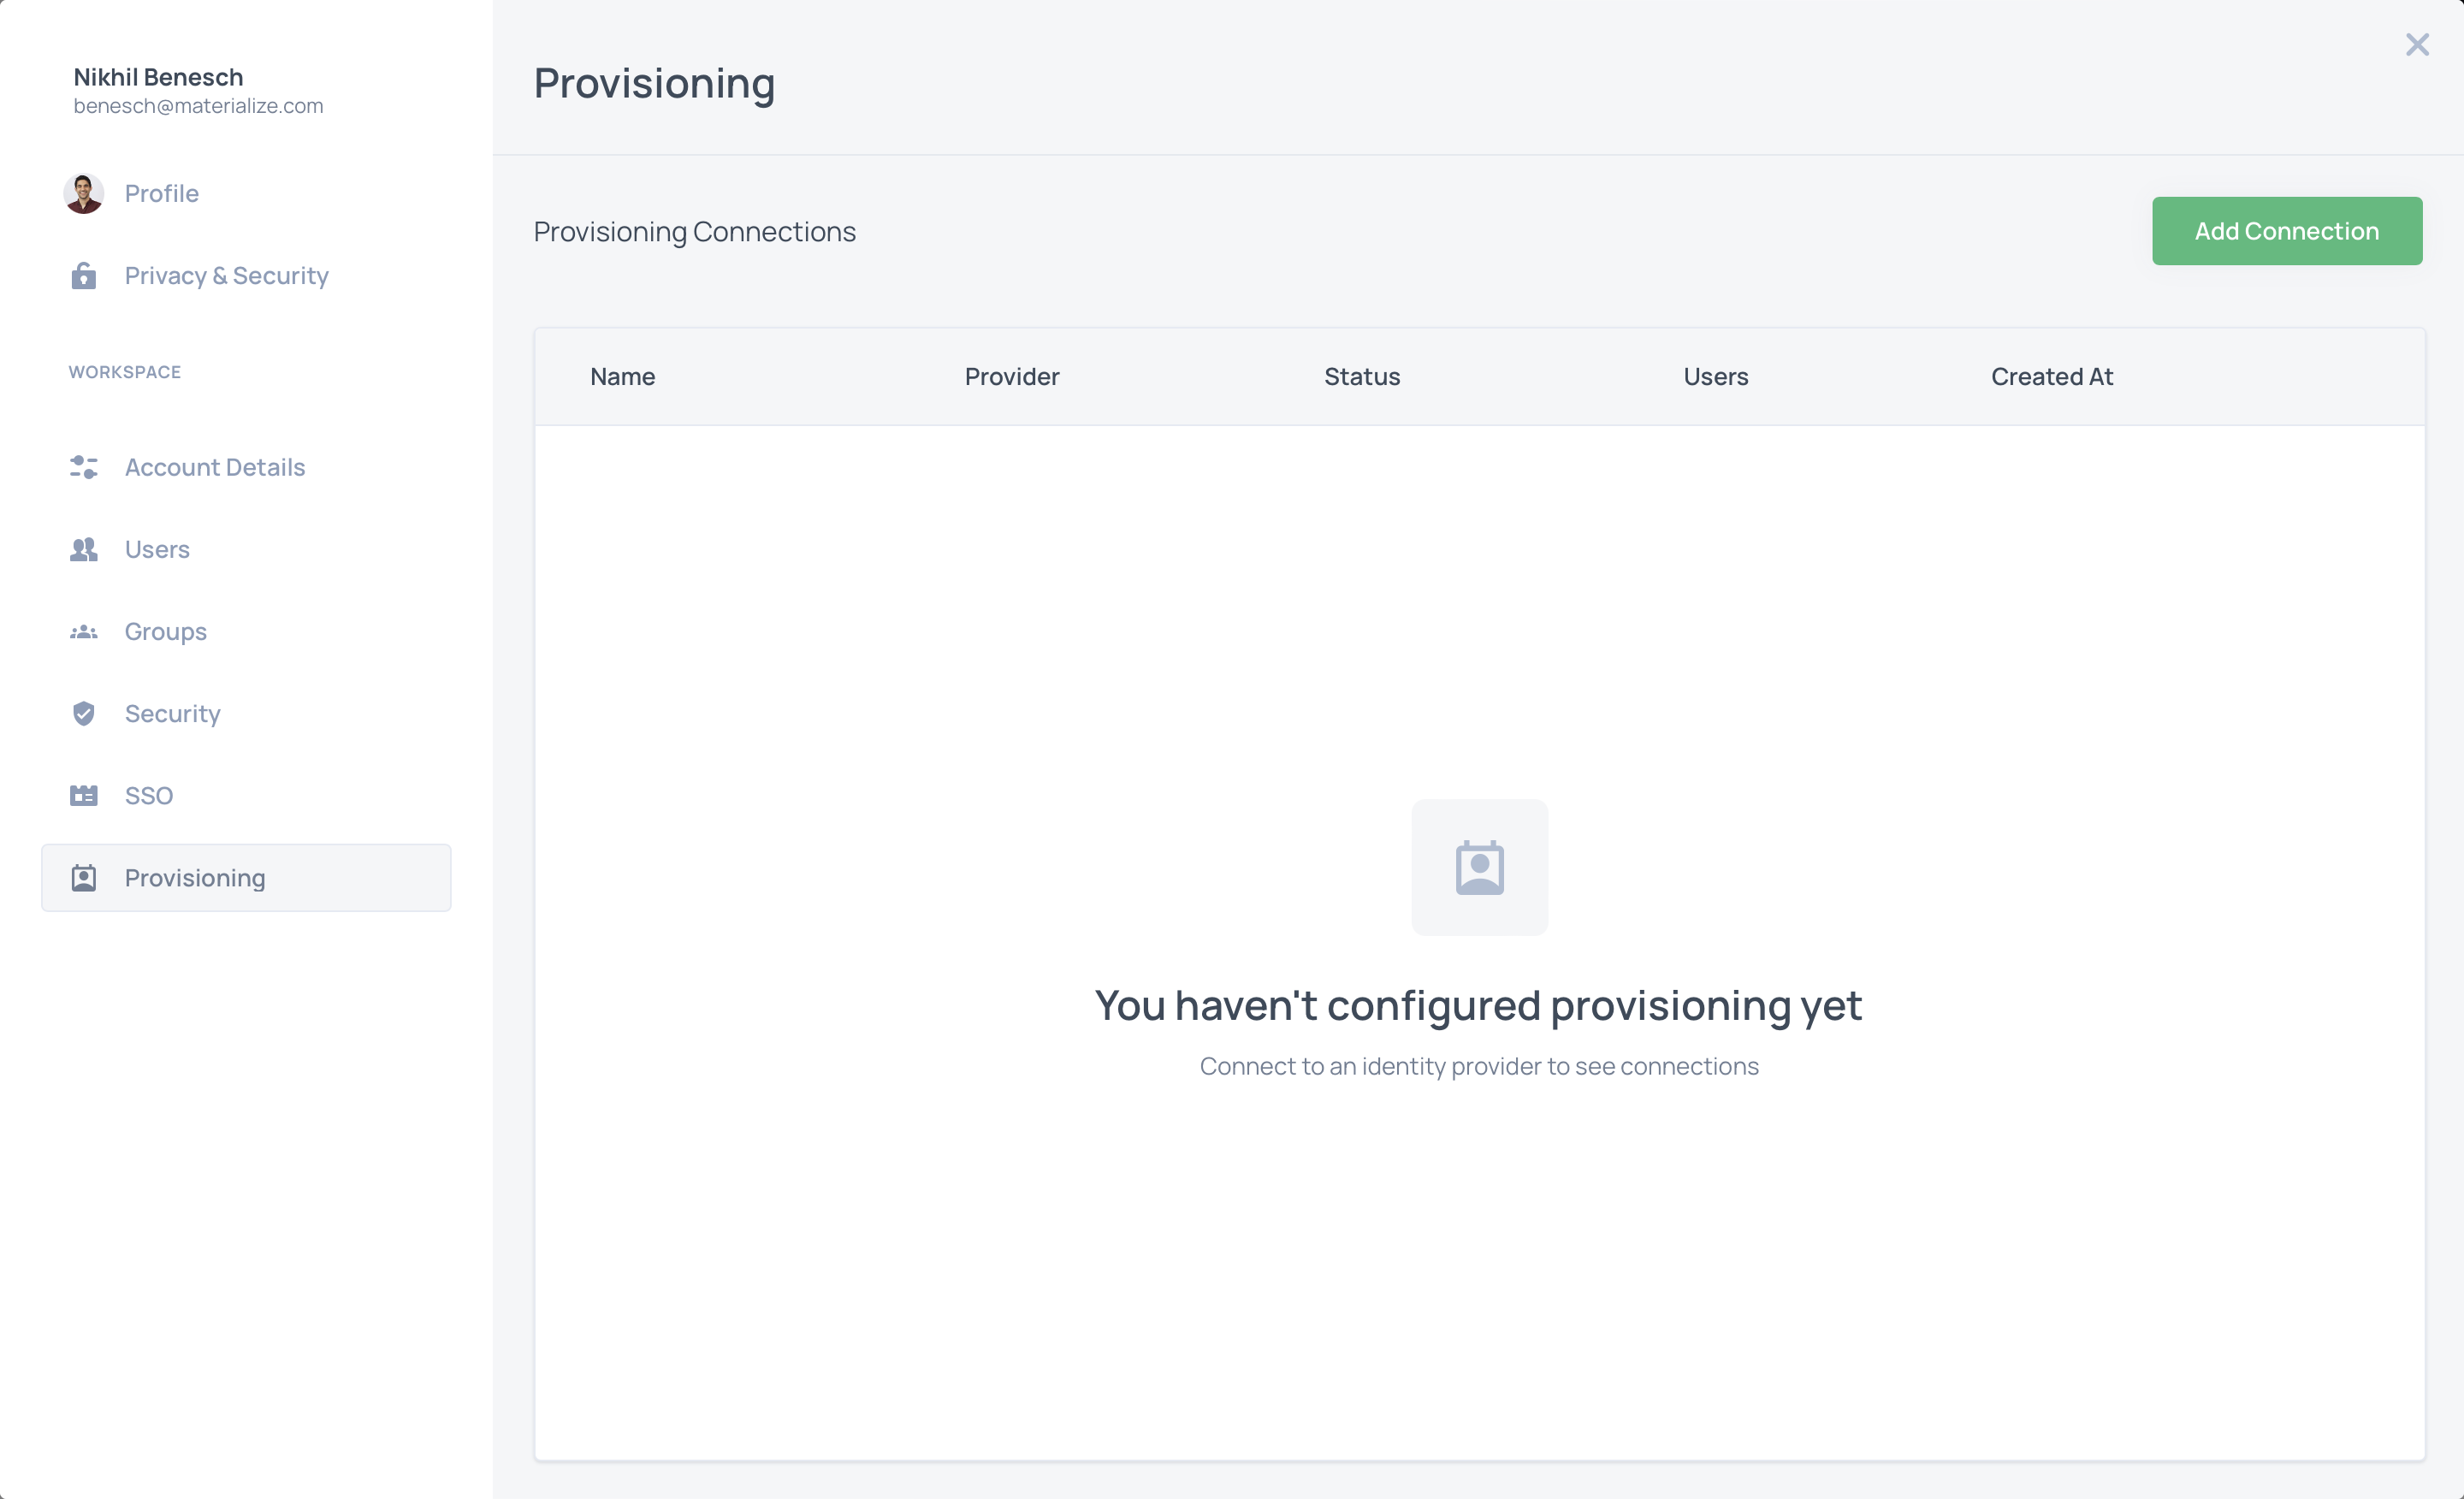
You can now automatically sync users and groups from your identity provider, like Okta or Active Directory, to Materialize. Syncing is facilitated via the industry standard SCIM protocol.
To get started, visit the new Provisioning tab in your account settings:
Capacity balance monitoring 💹
No more flying blind on your purchased capacity! You can now monitor your
current capacity balance at any time in the Materialize console, under
Invoices. This is available to
administrators of any organization that’s on a Capacity plan.

This is the first of many ongoing improvements for cost monitoring in Materialize — stay tuned for updates. If you have any feedback, or just opinions about billing observability, we’d love to hear about it!
Hello, console world!
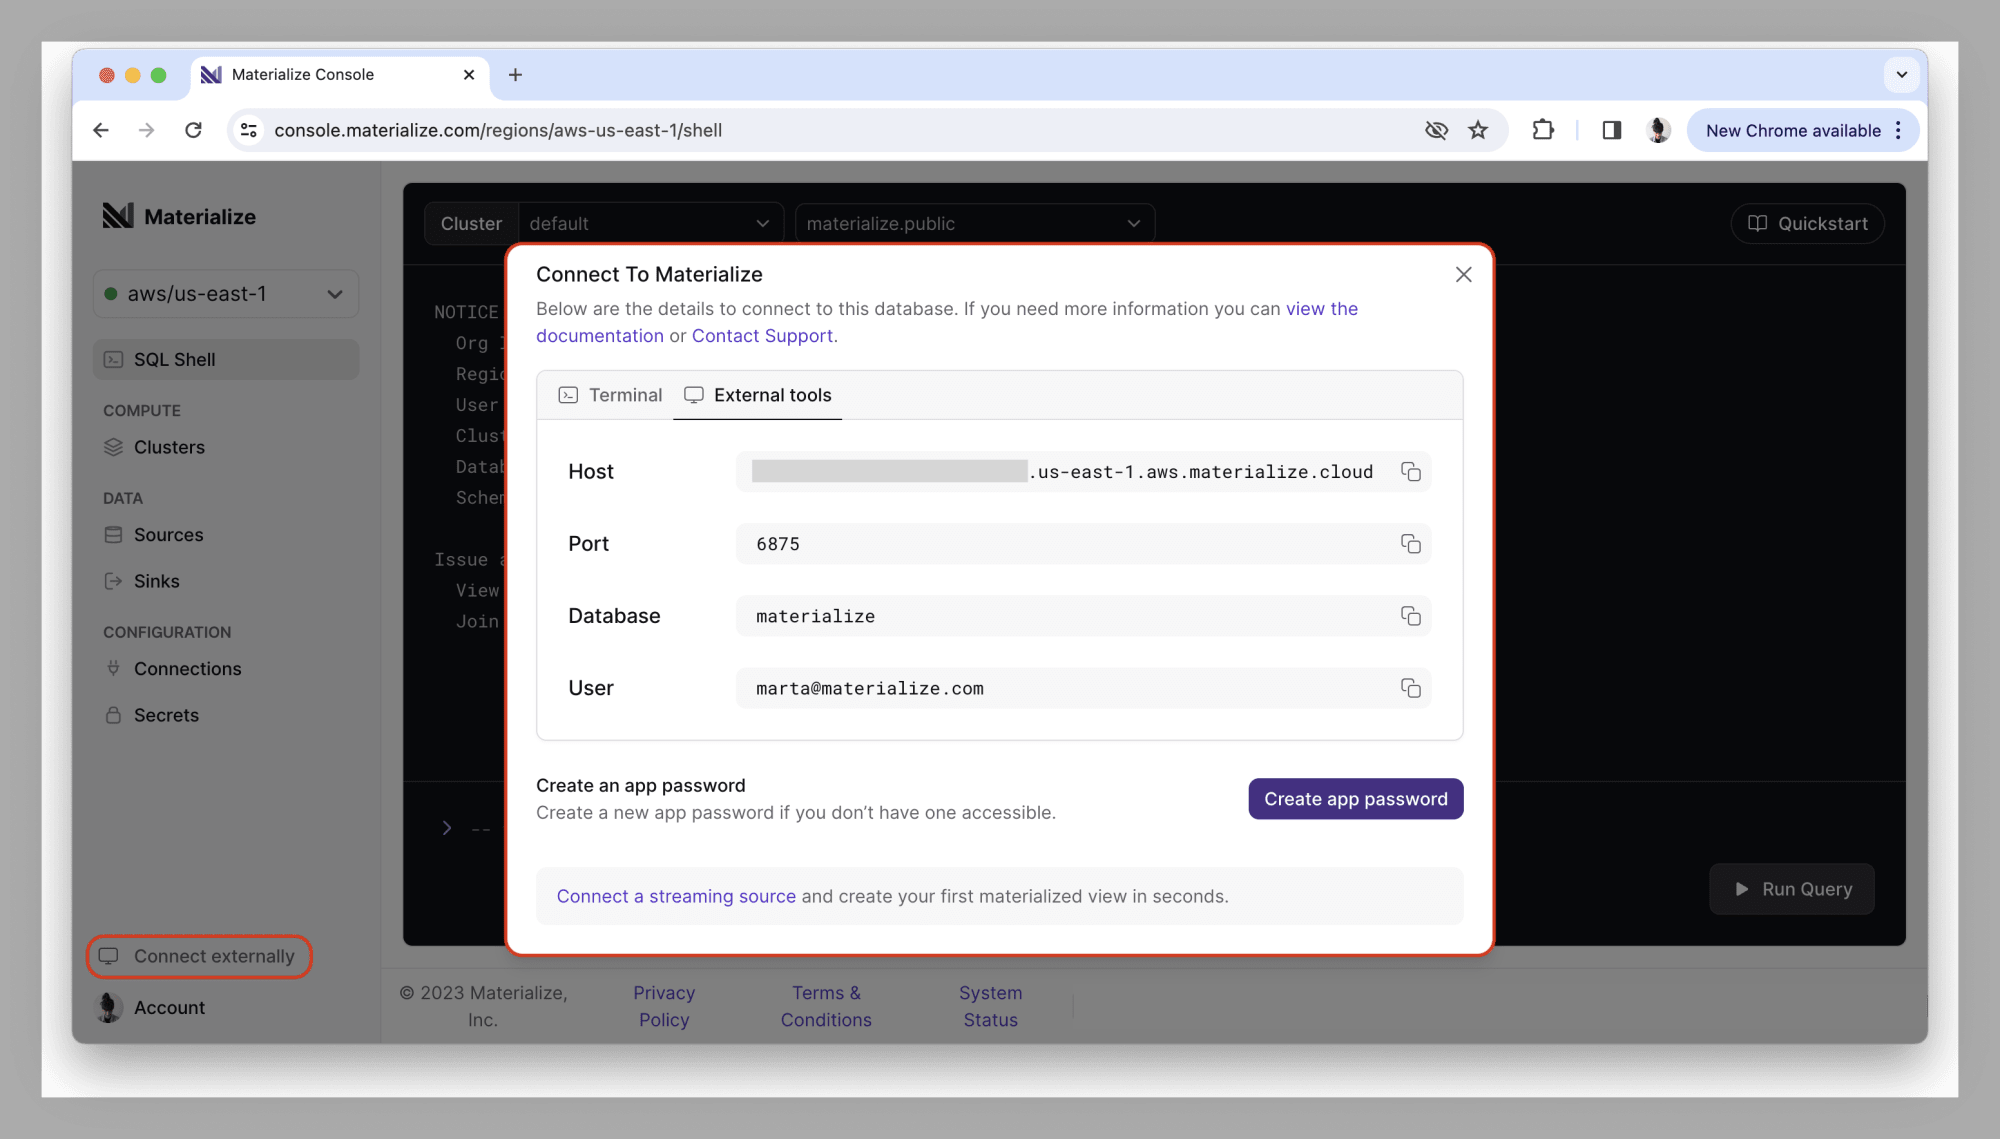
We did some house cleaning in the Materialize console: when you log in, you’re now dropped straight into the SQL shell, so you can start interacting with your region without having to click around. You’ll notice that the connection details are now printed to the shell, too!
When you’re ready to connect using an external tool, you can find the credentials at the bottom of the navigation bar, under Connect externally.
SQL activity log
Organization administrators can now access the history of SQL statements run
against Materialize using the new mz_internal.mz_recent_activity_log
system catalog view. This allows performing database administration tasks like identifying
slow or long-running queries, monitoring query performance SLAs,
and analyzing access patterns.
-- Say you have an SLA of "queries return under 3 seconds", and want to look
-- into any statements that don't comply. 🦥
SELECT
    sql,
    application_name,
    cluster_name,
    rows_returned,
    (finished_at - began_at) AS execution_time,
    finished_status
FROM mz_internal.mz_recent_activity_log
WHERE (finished_at - began_at) > INTERVAL '3 seconds'
ORDER BY execution_time DESC;
In the future, the activity log will also be exposed in the Materialize console, so it’s easier to access.
New Workflow graph 👀
The days of fiddling with the system catalog to understand why your queries are laggy or unresponsive are over! With the new Workflow graph freshly available in the Materialize console, you can get a visual overview of the (resource-consuming) dependencies for an object, as well as track the freshness of its data.
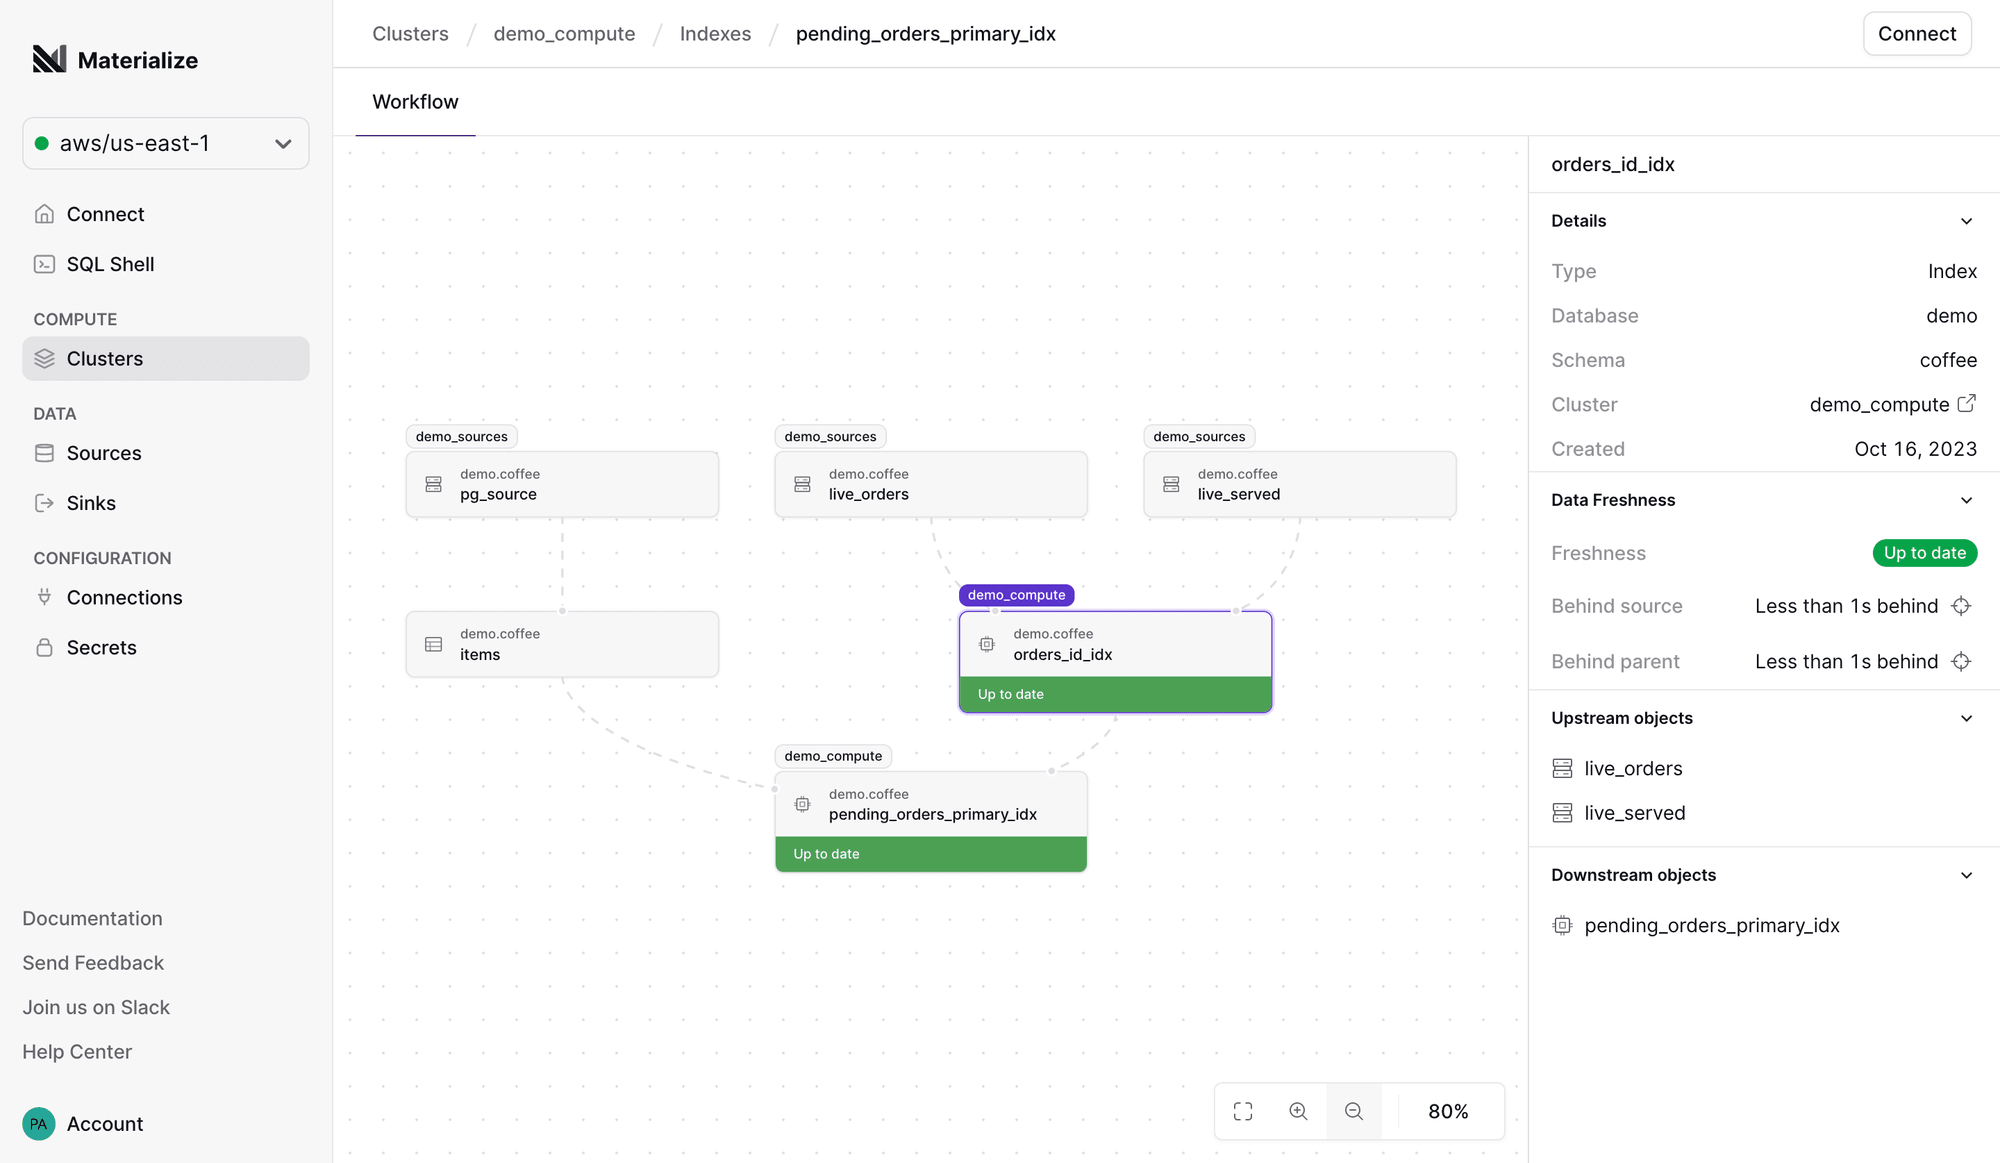
Experiencing unexpected query latency? Not getting results back at all? Open up
the Workflow tab for the offending object, and the graph will help you
pinpoint where the bottleneck is being introduced.

Before you start: this feature applies to all object types that require Materialize to do some work (i.e. sources, indexes and materialized views), but won’t give you an overview of the whole data model — at least, not yet! If you’re looking for a full-blown lineage graph, we recommend checking out dbt and its documentation features for the time being.
Materialize CLI
We are releasing a command-line interface (CLI) for Materialize into the wild!
The Materialize CLI (mz) is built to improve your day-to-day workflow
for common environment management tasks, and gives you a programatic way to
manage resources like regions, users, or secrets.
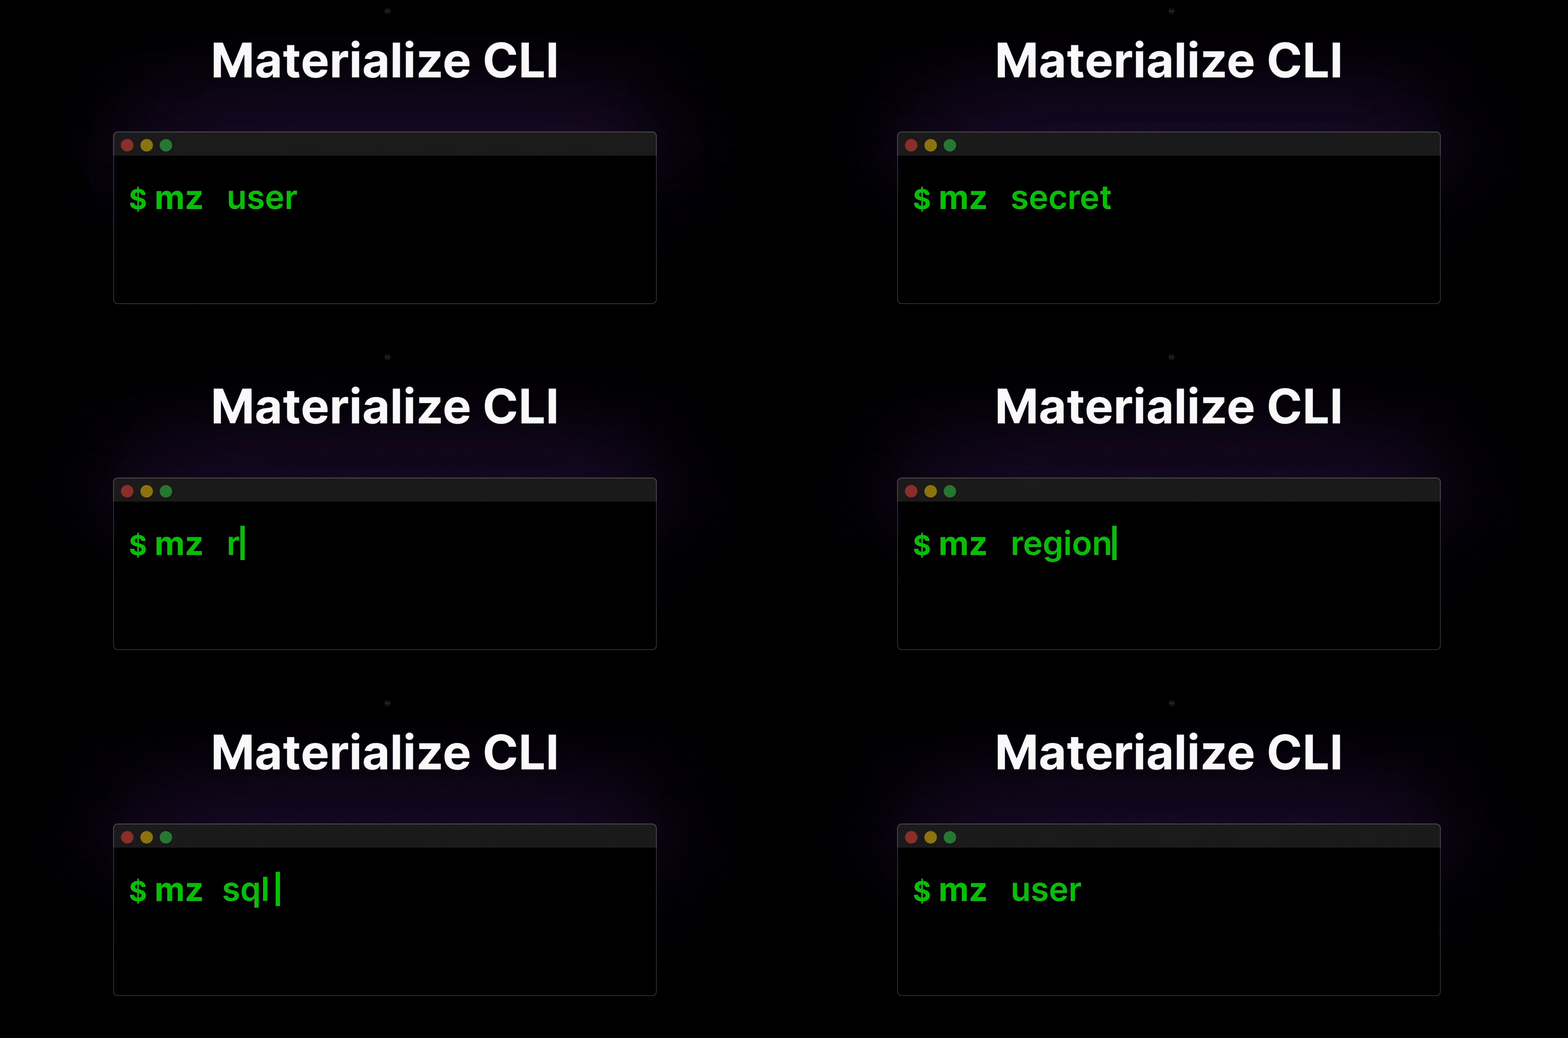
Feature highlights:
- Profiles: manage and switch between multiple authentication profiles.
- App passwords: create new, or list existing, app passwords.
- Regions: enable, disable, list, or show your region’s connection details.
- Users: add, remove, or list users in your organization.
- Secrets: create secrets without leaving a trace in your logs.
- SQL: quickly open a SQL session against your region.
Check the documentation for
installation steps and all available commands. If you have any
feedback, or just opinions about what mz should do but doesn’t, we’d love
to hear about it!
Aggregate window functions
If you’re used to traditional data warehouses, reaching for functions like AVG () or SUM() to get a rolling aggregation is second nature. Things aren’t as
simple for real-time data — as it turns out, calculating window aggregations
over ever-changing data is hard. 😰
But we’ve made it! Support for aggregate window functions is here, so you can
more naturally express common query patterns that require using an aggregate
function with an OVER clause:
-- Hey Materialize: give me the cumulative $um of sales over time.
SELECT time,
       amount,
       SUM(amount) OVER (ORDER BY time) AS cumulative_amount
FROM sales
ORDER BY time;

 time | amount | cumulative_amount
------+--------+-------------------
    1 |      3 |                 3
    2 |      6 |                 9
    3 |      1 |                10
    4 |      5 |                15
    5 |      5 |                20
6 | 6 | 26-- Need more control over the granularity of the rolling aggregation? The ROWS
-- BETWEEN clause is also supported!
SELECT time,
amount,
SUM(amount) OVER (ORDER BY time ROWS BETWEEN 2 PRECEDING AND CURRENT ROW) AS cumulative_amount
FROM sales
ORDER BY time;
time | amount | cumulative_amount
------+--------+-------------------
1 | 3 | 3
2 | 6 | 9
3 | 1 | 10
4 | 5 | 12
5 | 5 | 11
6 | 6 | 16Head over to the documentation for an overview of window function support in Materialize.
dbt adapter: model contracts, new configuration for tests, and more!
dbt is the most popular tool to manage Materialize deployments in production
(along with Terraform), and
we do our best to keep our adapter in sync with any new features landing in
dbt-core! With dbt-materialize v1.6.0 freshly released, here are a few
🔥 improvements that can elevate your data deployments.
Model contracts
You can now enforce model contracts
for view, materializedview and table materializations to guarantee that
there are no surprise breakages to your pipelines when the shape of the data
changes.
# Enforce a contract by using the new `contract` config. This requires that all
# columns in the model are listed with the respective name and data_type.
models:
  - name: on_time_bids
    description: On time auction bids
    config:
        contract:
          enforced: true
    columns:
      - name: auction_id
        description: ID of the auction
        data_type: bigint
  ...
  - name: amount
        description: Bid amount
        data_type: int
...# If there is a mismatch between the defined contract and the model you’re trying
# to compile, dbt will fail during compilation!
16:37:58
16:37:58 | column_name | definition_type | contract_type | mismatch_reason |
16:37:58 | ----------- | --------------- | ------------- | ------------------- |
16:37:58 | bid_id | LONGINTEGER | | missing in contract |
16:37:58 | amount | TEXT | INTEGER | data type mismatch |As a side note: Materialize does not have a notion of constraints, so model- and column-level constraints are not supported.
Cluster configuration for tests
A small but mighty change: you can now configure a target cluster to run your tests against (for both one-shot and continuous testing). This means that it’s possible to configure your models to run against a specific cluster (i.e. dedicated compute resources), and ensure that tests don’t impact the performance of your data warehouse by configuring them to use a different cluster.
  tests:
    example:
      +store_failures: true # this is optional (and called "continuous testing")
      +schema: 'dbt_test_schema'
      +cluster: 'dbt_test_cluster'
New materialization name, same materialized views
The latest release of dbt-core has introduced support for materialized
views for multiple data warehouses via the new materialized_view
materialization. Now, if you’ve been following Materialize, you’ll know that
we’ve always supported incrementally updated materialized views via the custom
materializedview materialization. Our materialized views are still special,
and nothing really changes; we’re just adjusting the name for consistency.
New
{{ config( materialized = 'materialized_view' )}}Deprecated
{{ config( materialized = 'materializedview' )}}The deprecated materialization name will be removed in a future release of the adapter, so we encourage you to tweak any relevant models with this upgrade!
Query cancellation
Last but not least, we patched a long-running pet peeve that prevented query cancellation in the adapter. All you have to do now is press Ctrl+C, and any outstanding queries will be ☠️.
To upgrade to the latest version of the dbt-materialize adapter (v1.6.0), run
pip install --upgrade dbt-materialize, and take a peek at the full changelog.
If it’s your first time hearing about dbt + Materialize for real-time data
wrangling, head over to our documentation
for an intro.
Connection validation
Few things are more common than fat-fingering connection parameters. To avoid the frustrating loop of creating, dropping, and recreating your connections, Materialize now supports connection validation.
Two ways!
For most connection types, Materialize automatically runs the validation check on connection creation, so you get an error as soon as you run the DDL statement:
-- Say you mess up your PostgreSQL credentials and try to create a
-- connection
CREATE SECRET pg_password AS 'wr0nGpa$$w0rd';

CREATE CONNECTION pg_connection TO POSTGRES (
    HOST 'instance.foo000.us-west-1.rds.amazonaws.com',
    PORT 5432,
    USER 'postgres',
    PASSWORD SECRET pg_password,
    SSL MODE 'require',
    DATABASE 'postgres'
);

-- Not on our watch!
Error: db error: FATAL: password authentication failed for user "materialize": FATAL: password authentication failed for user "postgres"
For AWS PrivateLink
and SSH tunnel
connections, which require a more intricate set of configuration steps across
multiple systems, Materialize can’t perform this validation off the bat, but
allows you to manually validate the connection with the new
VALIDATE CONNECTION syntax:
-- Once you're done configuring the AWS PrivateLink service and create a
-- connection
CREATE CONNECTION privatelink_svc TO AWS PRIVATELINK (
    SERVICE NAME 'com.amazonaws.vpce.us-east-1.vpce-svc-0e123abc123198abc',
    AVAILABILITY ZONES ('use1-az1', 'use1-az4')
);

-- Check if the setup is 👍, before using the connection to create
-- a source or sink
VALIDATE CONNECTION privatelink_svc;
If no rows are returned, you’re good to go! Configuration issues will lead to a validation error with details on where things went haywire.
Role-based access control (RBAC) 🔒
We’ve rolled out role-based access control (RBAC) so you (well, an admin) can define a hierarchy of roles and permissions for your organization. If you’re familiar with how RBAC works in PostgreSQL, Materialize largely follows the same principles — check the documentation for a refresher!
Say you want to onboard a Data Science team to your Materialize organization, but this team should only have access to a specific namespace and dedicated compute resources:
-- Create a role through which Data Science team members can inherit a specific
-- set of privileges
CREATE ROLE data_scientist;

-- Grant the Data Science team members the data_scientist role
GRANT data_scientist TO "gerald@dharma.com", "karen@dharma.com";

-- Create a dedicated namespace and spin up some compute resources for Data
-- Science team work
CREATE DATABASE actual_science;
CREATE CLUSTER for_science (SIZE = '3xsmall');

-- Grant the data_scientist role free reign over the actual_science database and
-- the for_science cluster
GRANT ALL PRIVILEGES ON DATABASE actual_science TO data_scientist;
GRANT ALL PRIVILEGES ON CLUSTER for_science TO data_scientist;

-- If a Data Science team member ever tries to do science elsewhere...
-- (e.g. running as gerald@dharma.com)
SELECT AVG(speed) FROM not_science.public.asteroids;
ERROR:  permission denied for TABLE "not_science.public.asteroids"
Pretty standard, huh?
RBAC is also supported in the Materialize Terraform provider (v0.0.9+). If you’re using Terraform to manage region-level resources like connections, sources, sinks and others, you can now also manage roles, object ownership and permissions in an automated, source-controlled way.
PostgreSQL source: support adding and dropping tables
We get it: schemas change.
We’ve landed some quality-of-life improvements that make it easier to
handle schema evolution and replication errors in PostgreSQL sources.
By easier, we mean that you no longer have to drop and recreate the whole
source, but can instead use the new ALTER SOURCE...{ADD|DROP} TABLE syntax to
patch a specific table (or set of tables).
As an example, if you add a important_col column to the important_tbl table
in your upstream PostgreSQL database, and want to make sure this new column
starts being ingested in the pg_source PostgreSQL source in Materialize:
-- List all subsources in pg_source
SHOW SUBSOURCES ON pg_source;

-- Get rid of the outdated subsource
ALTER SOURCE pg_source DROP TABLE important_tbl;

-- Start ingesting the table with the updated schema
ALTER SOURCE pg_source ADD TABLE important_tbl;
The same approach works for incompatible schema changes that might cause one or more subsources to stall. For more details on how to handle each scenario, check the updated documentation.
DBeaver native driver
DBeaver users have long been able to connect to Materialize via the native
PostgreSQL connector, due to our pgwire compatibility.
This just works™️, but can cause some confusion, as well as annoying errors that
pop up when you accidentally click a widget for features that don’t carry over
to Materialize (like triggers).
From DBeaver 23.1.3, you can connect to your Materialize region using the new native database driver:
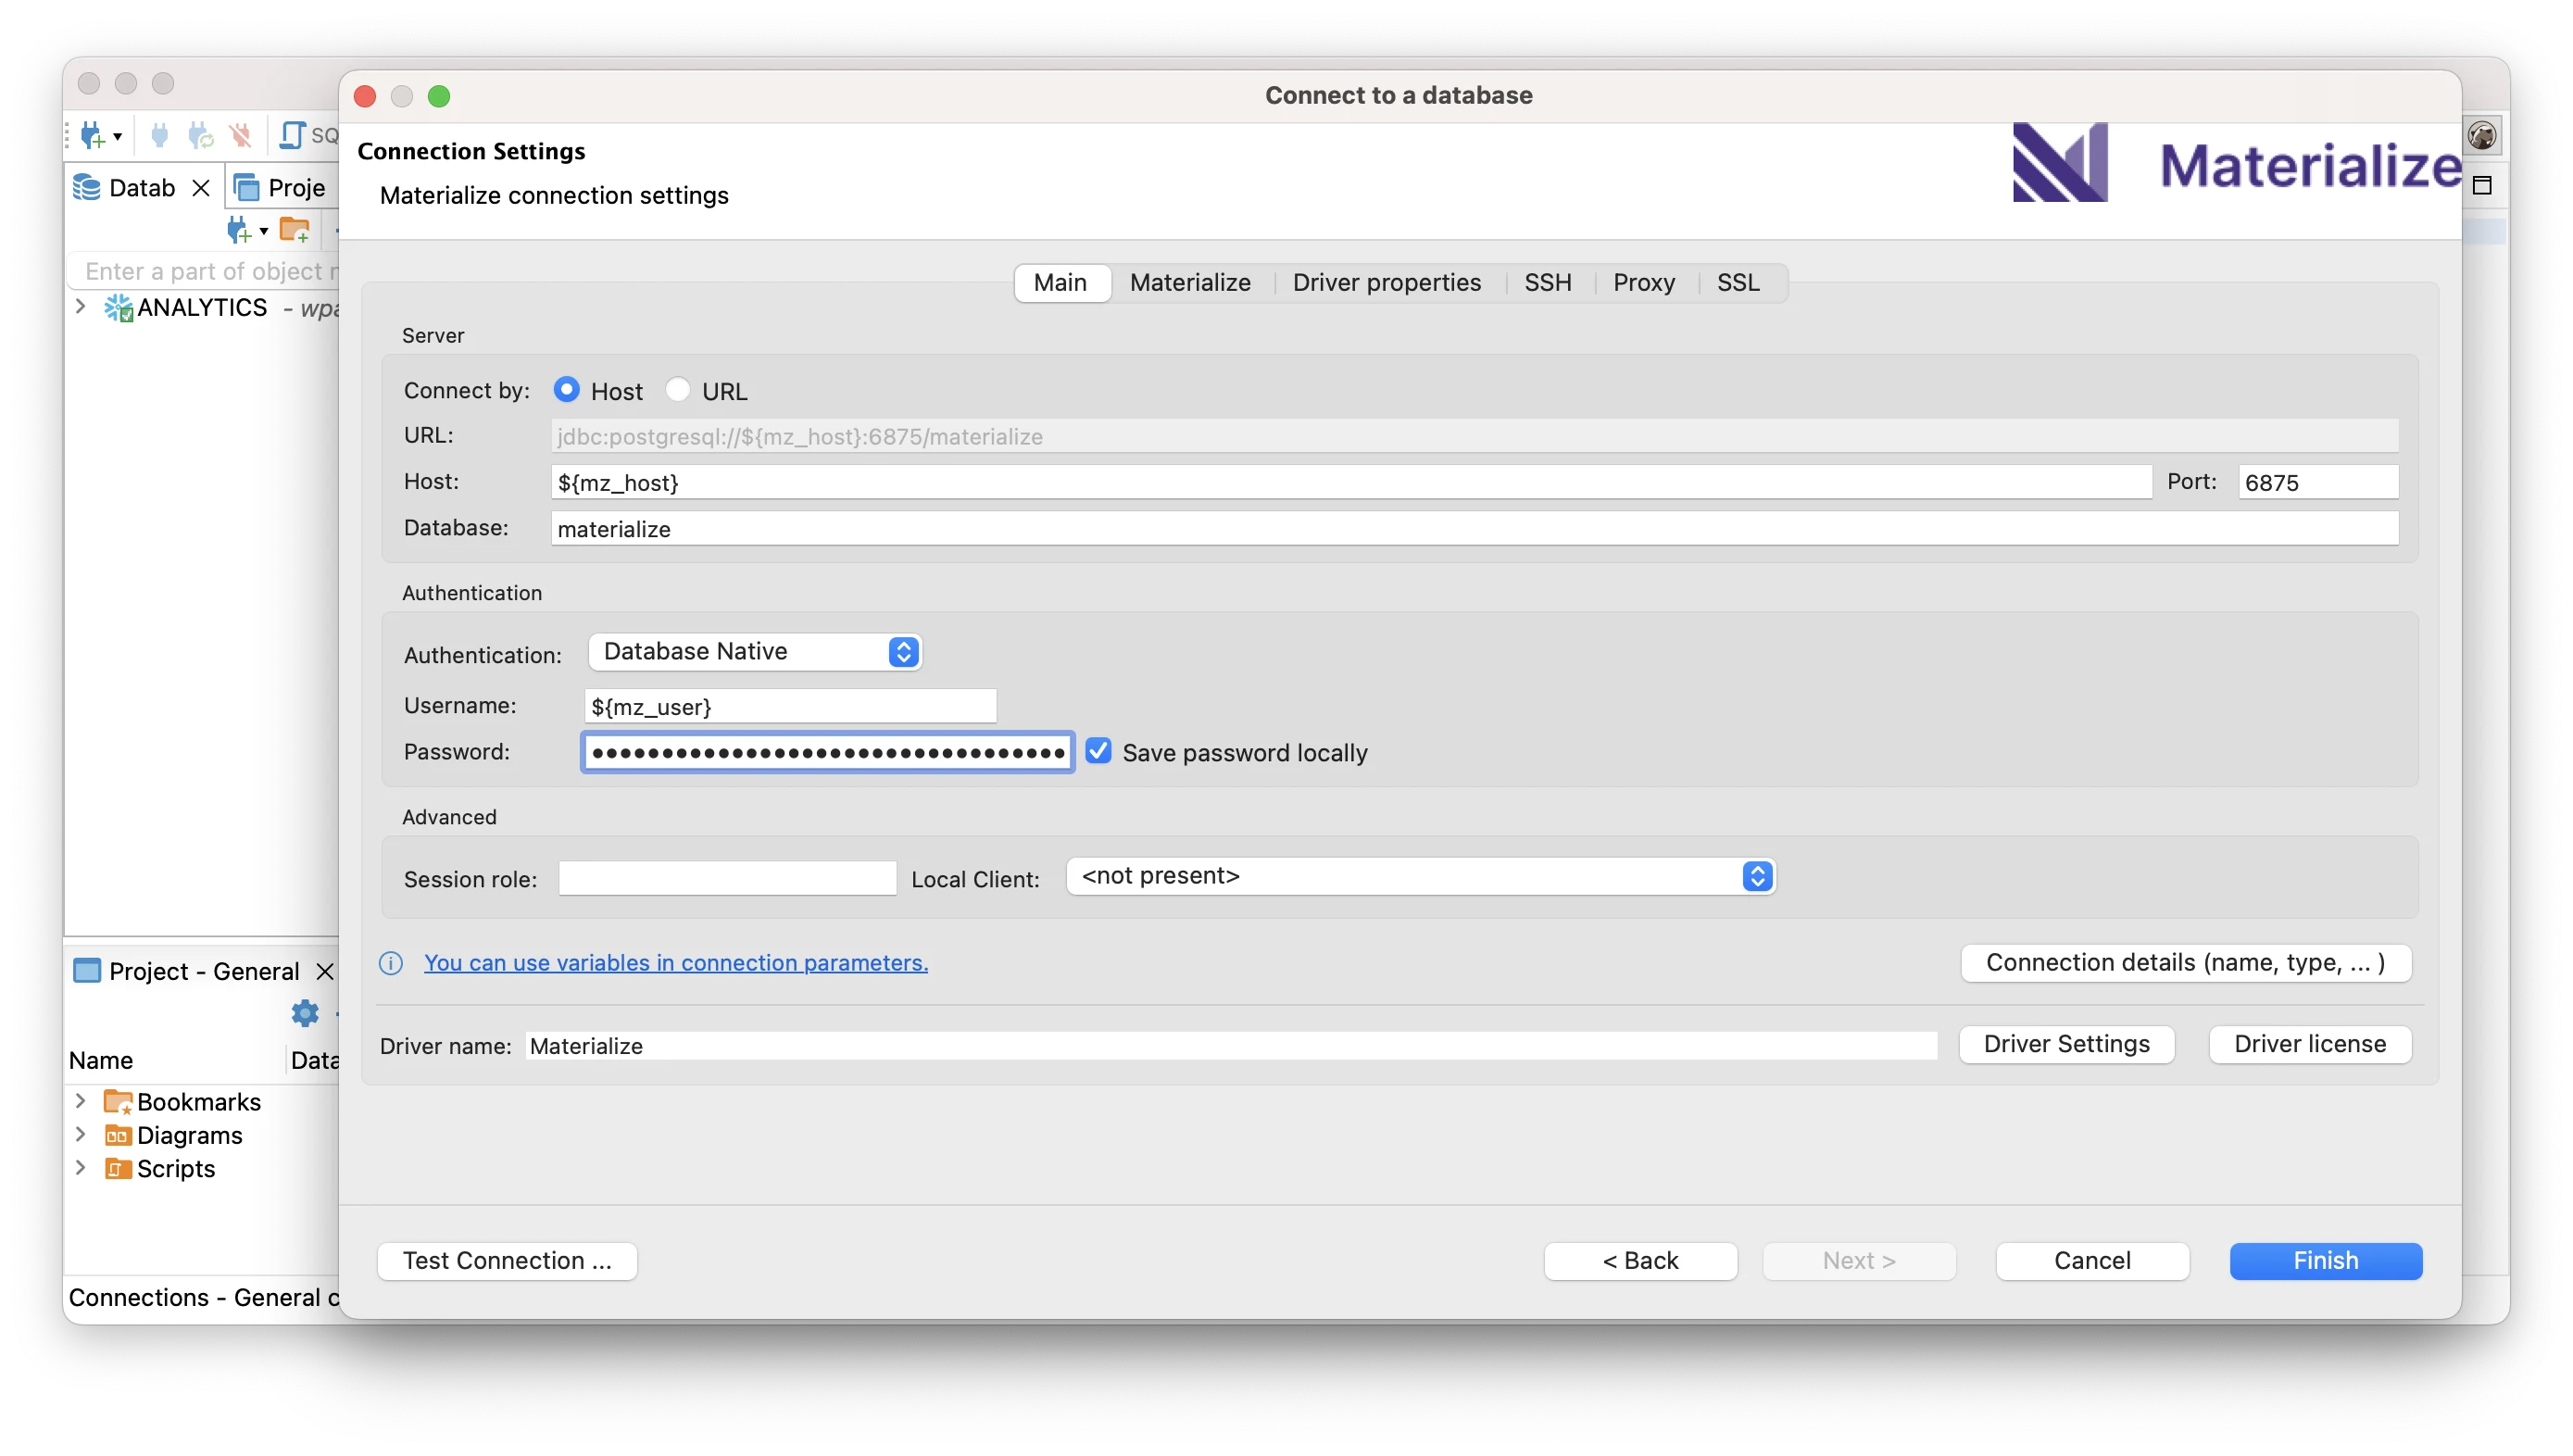
If you’re already using Materialize with DBeaver, switch over for a smoother experience! 🦫 Check the updated documentation to connect.
New SQL shell 🐚
We’re lifting the veil on a shiny, new SQL shell that lets you interact with Materialize right in the console! Neat, huh?
Although this isn’t a replacement for your everyday SQL development environment (at least for now), it’s just…right there. No more context switching just to learn your way around Materialize, run sanity checks, or pull up that data real quick. If you have any feedback, or just opinions about what the SQL shell should do but doesn’t, we’d love to hear about it!
Want to give the new SQL shell a go? Sign up for a 14-day free trial of Materialize.
Kafka source: improved JSON support
Handling JSON-encoded Kafka topics in Materialize isn’t fun. We’ve taken the
first step to improve JSON support in the Kafka source by introducing a new
FORMAT JSON option
that decodes messages as jsonb, saving you some conversion typing in
comparison to FORMAT BYTES.
The old way
CREATE SOURCE json_source
  FROM KAFKA CONNECTION kafka_connection (TOPIC 'ch_anges')
  FORMAT BYTES
  WITH (SIZE = '3xsmall');

CREATE VIEW extract_json_source AS
  SELECT
    (data->>'field1')::boolean AS field_1,
    (data->>'field2')::int AS field_2,
    (data->>'field3')::float AS field_3
  -- This is not fun
  FROM (SELECT CONVERT_FROM(data, 'utf8')::jsonb AS data FROM json_source);
The new way
CREATE SOURCE json_source
  FROM KAFKA CONNECTION kafka_connection (TOPIC 'ch_anges')
  FORMAT JSON
  WITH (SIZE = '3xsmall');

CREATE VIEW extract_json_source AS
  SELECT
    (data->>'field1')::boolean AS field_1,
    (data->>'field2')::int AS field_2,
    (data->>'field3')::float AS field_3
  -- This is slightly more fun!
  FROM json_source;
The FORMAT JSON option is already supported in the source creation UI,
and will land in the upcoming v0.1.0 release of the Terraform provider.
In the future, we plan to support automatically enforcing JSON schemas, both for
user-provided schemas and schemas managed via Confluent Schema Registry.
Cluster management (revisited)
Clusters are one of the very first concepts you run into when getting started with Materialize — you need compute resources to run your queries, right? We’ve simplified how clusters and their dedicated resources (aka replicas) are exposed, so they’re more intuitive to manage.
To create a new cluster, you can now simply specify its SIZE and REPLICATION FACTOR, instead of thinking about individual replicas for provisioning and
replication. Here’s a quick tour of how cluster management works from hereon:
-- Create a cluster with provisioned resources
CREATE CLUSTER demo SIZE = '3xsmall';

--Resize the cluster
ALTER CLUSTER demo SET (SIZE = 'small');

--Increase the replication factor for fault tolerance
ALTER CLUSTER demo SET (REPLICATION FACTOR=2);

-- Turn off the cluster for the night, to save $$!
ALTER CLUSTER demo SET (REPLICATION FACTOR=0);
You can still choose to manage the replicas in a cluster manually, for example to gracefully resize it without downtime, but the bottom line is: you shouldn’t have to! We’ll continue working on improving cluster management, and are eyeing features like zero-downtime resizing, autoscaling, and automatic rebalancing across availability zones for future releases. Head over to the documentation for the full rundown!
New source creation UI ✨
We’ve made it easier to connect to external data sources right in the web console: with just a few clicks, you can configure a connection and start ingesting data into Materialize using the new source creation UI. Look ma, no DDL:
For now, this workflow is restricted to PostgreSQL and Kafka sources that don’t require network security configuration. We’ll add support for configuring PrivateLink and SSH connections via the web console next! Until then, you can fire up a SQL client and head over to our documentation for step-by-step network security guides.
The Materialize Changelog is here!
A lot has changed since we rolled out the next generation of Materialize (v0.27). But how would you know? We’re starting a changelog to keep you up to speed with all new features and improvements landing in and around Materialize!